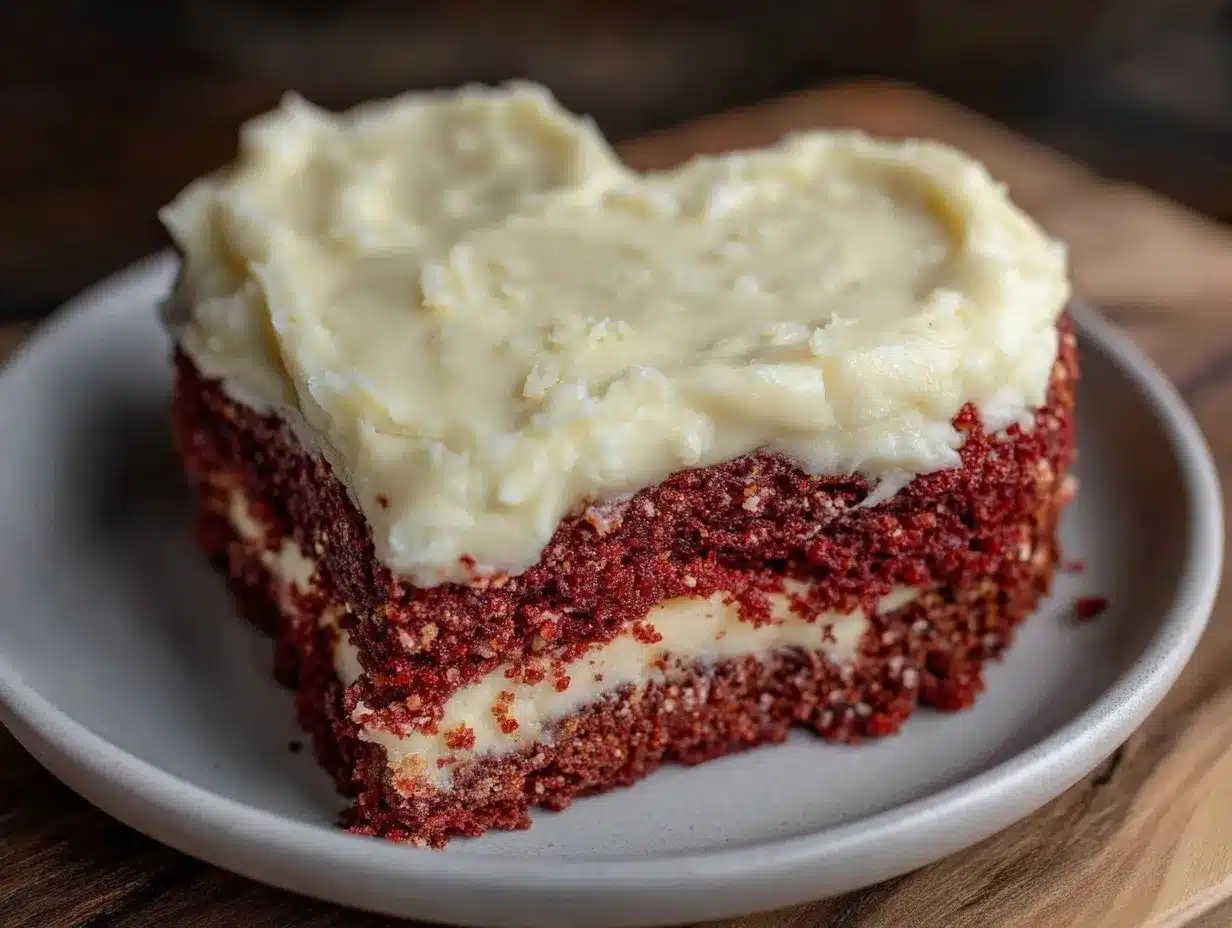
The rich, velvety texture of a red velvet cake paired with the tangy smoothness of cream cheese frosting always feels like a little slice of heaven. Honestly, the first time I baked this decadent red velvet heart-shaped layer cake with cream cheese frosting, it was for a Valentine’s Day surprise, and the look on everyone’s faces said it all. The smell alone—sweet cocoa mingling with a hint of vanilla and that unmistakable red hue—takes me back to cozy kitchen moments filled with laughter and the hopeful anticipation of sharing something special.
Over the years, I’ve tested this recipe more times than I can count, tweaking the balance of flavors and perfecting the frosting to get that smooth, creamy finish that isn’t too sweet or too tangy. If you’re someone who loves a show-stopping dessert that’s as beautiful as it is delicious, this red velvet heart-shaped layer cake is your new go-to. Whether you’re baking for a birthday, anniversary, or just because you want to treat yourself (I’ve been there), this cake hits all the right notes.
What’s great about this recipe is how it combines classic flavors with a fun, romantic shape that’s perfect for sharing or impressing your loved ones. Plus, the homemade cream cheese frosting adds that perfect touch of richness that store-bought just can’t match. So, if you’ve been hunting for a rich, moist red velvet cake recipe that’s easy to make and looks stunning, you’re in the right place.
Why You’ll Love This Recipe
- Quick & Easy: This decadent red velvet heart-shaped layer cake comes together in under 90 minutes, making it perfect for last-minute celebrations or sweet cravings.
- Simple Ingredients: No need for exotic items—basic pantry staples like cocoa powder, buttermilk, and cream cheese create a cake that tastes professional but is totally doable at home.
- Perfect for Occasions: Whether it’s Valentine’s Day, Mother’s Day, or a romantic dinner, the heart shape adds a special touch that guests will adore.
- Crowd-Pleaser: Kids love the bright red color, and adults appreciate the balance of sweetness and tang from the cream cheese frosting.
- Unbelievably Delicious: The texture is moist and tender, and the frosting is creamy and luscious—a combo that truly comforts the soul.
This isn’t your run-of-the-mill red velvet cake. I blend the cocoa and red food coloring just right to create that iconic red tint without overpowering the cocoa flavor. Plus, the homemade cream cheese frosting is whipped to just the right consistency so it spreads effortlessly but holds its shape beautifully. I’ve even swapped out regular buttermilk for a quick DIY version when I ran out—worked like a charm!
It’s the kind of cake that makes you want to pause, close your eyes, and savor every bite. Seriously, it’s comfort food with a touch of elegance, and baking it yourself means you get to decide how sweet or tangy you want that frosting to be. I love how it brings smiles and a bit of magic to any table.
What Ingredients You Will Need
This recipe uses simple, wholesome ingredients to deliver bold flavor and satisfying texture without the fuss. Most of these are pantry staples or easy to find at any grocery store. I always recommend using full-fat cream cheese for the frosting—it really makes a difference in the richness and tang.
- For the Cake Batter:
- All-purpose flour – 2 ½ cups (312 grams), sifted for a light texture
- Granulated sugar – 1 ½ cups (300 grams)
- Unsweetened cocoa powder – 1 ½ tablespoons (12 grams), preferably Dutch-processed for smooth flavor
- Baking soda – 1 teaspoon (5 grams)
- Salt – ½ teaspoon (3 grams)
- Buttermilk – 1 cup (240 ml), room temperature (substitute: 1 cup milk + 1 tbsp lemon juice, let sit 5 mins)
- Vegetable oil – 1 cup (240 ml), for moistness
- Large eggs – 2, room temperature
- Vanilla extract – 1 teaspoon (5 ml), pure for best aroma
- Red food coloring – 2 tablespoons (30 ml), gel or liquid (gel preferred for vibrant color)
- Distilled white vinegar – 1 teaspoon (5 ml), reacts with baking soda to lighten texture
- For the Cream Cheese Frosting:
- Cream cheese – 8 ounces (225 grams), softened (I prefer Philadelphia brand for smoothness)
- Unsalted butter – ½ cup (115 grams), softened
- Powdered sugar – 4 cups (480 grams), sifted to avoid lumps
- Vanilla extract – 1 teaspoon (5 ml)
- Pinch of salt – balances sweetness
When choosing your cocoa powder, Dutch-processed works wonders for that subtle chocolate flavor without bitterness. For the red food coloring, gel types give you a more intense color with less mess. And if you want to try a dairy-free twist, swap cream cheese and butter with vegan alternatives—the frosting still turns out dreamy.
Equipment Needed
- Two 8-inch (20 cm) heart-shaped cake pans – for that perfect romantic shape (if you don’t have heart pans, round pans work fine too!)
- Electric mixer – handheld or stand mixer to whip the frosting smooth and batter well combined
- Mixing bowls – medium and large
- Measuring cups and spoons – for precise measurements
- Rubber spatula – to scrape the bowl and fold ingredients gently
- Cooling racks – essential for cooling layers evenly and preventing sogginess
- Offset spatula or butter knife – to spread frosting evenly and neatly
I personally love using an electric stand mixer because it cuts down on arm work and helps get that ultra-smooth frosting texture. If you’re on a budget, a sturdy handheld mixer works just as well. When using heart-shaped pans, make sure to grease them well and line with parchment paper to avoid any sticking drama. Cooling racks are a small investment but game-changers—they help your cake layers cool faster and keep their shape.
Detailed Preparation Method
- Preheat the oven to 350°F (175°C). Grease and flour two 8-inch heart-shaped cake pans, then line the bottoms with parchment paper for easy release. This step prevents sticking and keeps your hearts perfect.
- In a large bowl, sift together the all-purpose flour, cocoa powder, baking soda, and salt. Set aside. Sifting helps avoid lumps and gives a light crumb.
- In a separate bowl, whisk together the granulated sugar, vegetable oil, and eggs until smooth and slightly thickened, about 2 minutes. Add vanilla extract and red food coloring, mixing until the color is even and vibrant.
- Slowly alternate adding the dry ingredients and buttermilk to the wet mixture, starting and ending with the dry ingredients. Mix gently but thoroughly after each addition to avoid overmixing, which can toughen the cake. The batter should be smooth and pourable.
- Stir in the distilled white vinegar at the end. You’ll notice it fizz slightly—that’s how you know it’s working to make the cake tender and light.
- Divide the batter evenly between the prepared pans. Tap the pans gently on the counter to release any air bubbles. This helps prevent holes or cracks in your cake layers.
- Bake for 25-30 minutes, or until a toothpick inserted in the center comes out clean. Keep an eye on them around the 25-minute mark because ovens can vary. The cakes should spring back lightly when pressed.
- Remove from oven and cool in pans for 10 minutes. Then, carefully invert the cakes onto cooling racks and peel off parchment paper. Let cool completely before frosting—patience here really pays off.
- To make the cream cheese frosting, beat together the softened cream cheese and butter with an electric mixer on medium speed until smooth and creamy, about 2 minutes. Scrape down the sides as needed.
- Gradually add the powdered sugar, one cup at a time, mixing on low until combined, then increase speed to medium-high and beat until fluffy, about 3-4 minutes. Add vanilla extract and salt, beating briefly to combine.
- Assemble the cake by placing one layer on your serving plate, spreading a generous amount of frosting evenly. Top with the second layer and cover the entire cake with the remaining frosting. Use an offset spatula to smooth the sides and top.
- For a finishing touch, chill the cake in the refrigerator for at least 30 minutes before serving. This helps the frosting set nicely and makes slicing neater.
Pro tip: If your cake layers dome on top, trim them gently with a serrated knife for even stacking. Also, don’t rush the cooling or frosting steps—warm cake can melt your frosting and make a mess!
Cooking Tips & Techniques
One little trick I’ve learned is to always bring your eggs and buttermilk to room temperature before starting. It helps the batter mix smoothly and produces a finer crumb. Also, when measuring flour, spoon it lightly into the cup and level it off—packing flour can lead to dense cakes, and no one wants that.
When mixing the batter, don’t overdo it. Stir just enough to combine ingredients; overmixing activates gluten and makes the cake tough. I usually mix by hand during the final flour addition to keep things tender.
For frosting, chill your cream cheese and butter but make sure they’re soft enough to beat easily. If they’re too cold, the frosting can get lumpy; too warm, and it might get runny. I sometimes pop them in the microwave for 5-7 seconds if I’m in a hurry.
Timing matters—try to bake the layers back-to-back if possible so they cool around the same time. This way, you can assemble the cake without waiting hours and keep the cake fresh. While one layer is baking, prep the frosting ingredients or clean your bowls to save time.
And trust me on this: don’t skip the parchment paper lining. It might feel like extra work, but it saves you from cake rescue missions and keeps those heart shapes flawless.
Variations & Adaptations
This decadent red velvet heart-shaped layer cake is pretty flexible, so you can make a few tweaks to suit your taste or dietary needs.
- Gluten-Free Option: Swap the all-purpose flour with a 1:1 gluten-free baking blend. I’ve done this using Bob’s Red Mill and the texture stayed wonderfully moist.
- Vegan Version: Use flax eggs (1 tbsp ground flaxseed + 3 tbsp water per egg) and substitute plant-based milk plus apple cider vinegar for buttermilk. For frosting, try vegan cream cheese and vegan butter. The flavor is slightly different but still delightful!
- Flavor Twists: Add a teaspoon of espresso powder to the batter to deepen the cocoa notes, or fold in a handful of mini chocolate chips for extra bursts of chocolate.
- Alternate Shapes: Not a fan of hearts? Use round or square pans and decorate with themed frosting or edible flowers for birthdays or holidays.
Personally, I once made a mini version of this cake layered with fresh raspberries between the layers—talk about a hit! It’s a great way to add natural sweetness and a pop of color. Feel free to get creative; this cake plays well with a lot of flavors.
Serving & Storage Suggestions
Serve this red velvet heart-shaped layer cake chilled or at room temperature—both ways work beautifully. I find that letting it sit out for 10-15 minutes before slicing makes the frosting softer and the cake more tender on the palate.
Pair it with a cup of rich coffee or a glass of cold milk to balance the sweetness. For a special occasion, a raspberry coulis or fresh berries on the side add a lovely tart contrast.
To store, cover the cake loosely with plastic wrap or keep it in an airtight container in the refrigerator. It stays fresh for up to 4 days. If you want to freeze it, slice into individual portions and wrap tightly in plastic wrap and foil; freeze for up to 2 months.
Reheat frozen slices by thawing overnight in the fridge and bringing to room temperature before serving. The flavors actually mellow and deepen after a day or two, so if you can wait, it’s worth it!
Nutritional Information & Benefits
Each slice of this decadent red velvet cake with cream cheese frosting is about 350-400 calories, depending on slice size, with a good balance of fats, carbs, and protein from the cream cheese and eggs. The cake contains essential nutrients like calcium from the dairy and small amounts of iron from the cocoa powder.
While it’s certainly a treat, using real ingredients like fresh eggs, buttermilk, and quality cocoa powder means you’re getting more than just empty calories. Plus, homemade frosting lets you control sugar levels better than store-bought options.
For those watching dietary restrictions, swapping ingredients as mentioned can make this cake gluten-free or vegan-friendly without sacrificing much on taste or texture.
Conclusion
If you’re craving a show-stopping dessert that’s as delicious as it is charming, this decadent red velvet heart-shaped layer cake with cream cheese frosting is exactly what you need. It brings together classic flavors with a personal touch that’s perfect for any celebration or a sweet self-indulgence.
Don’t hesitate to customize the frosting sweetness or try those fun variations—it’s your cake, after all! I love how this recipe brings a bit of joy and warmth into my kitchen each time I make it, and I hope it becomes a favorite in your home too.
If you try this recipe, please drop a comment with your thoughts, or share any tweaks you made—I love hearing from fellow bakers! Happy baking and remember, a little sweetness goes a long way.
FAQs
Can I make this red velvet cake without food coloring?
You can, but the classic red velvet’s signature color comes from the red food coloring. Without it, the cake will look more like a chocolate cake with a hint of cocoa flavor. For a natural option, beet juice can be used, but it may alter the taste and color intensity.
How do I know when the cake is fully baked?
Insert a toothpick or cake tester into the center of the cake. If it comes out clean or with a few moist crumbs, the cake is done. If it has wet batter, bake a few minutes longer and check again.
Can I prepare the cake layers ahead of time?
Absolutely! You can bake the layers a day in advance, wrap them tightly in plastic wrap, and refrigerate. Just bring them to room temperature before frosting to avoid melting the frosting.
What’s the best way to store leftover cake?
Store leftovers in an airtight container in the fridge for up to 4 days. For longer storage, freeze slices wrapped in plastic and foil for up to 2 months.
Can I use store-bought frosting instead of homemade cream cheese frosting?
You can, but homemade frosting has a fresher taste and better texture. Store-bought versions may be sweeter and less creamy, which can change the balance of flavors.
Pin This Recipe!
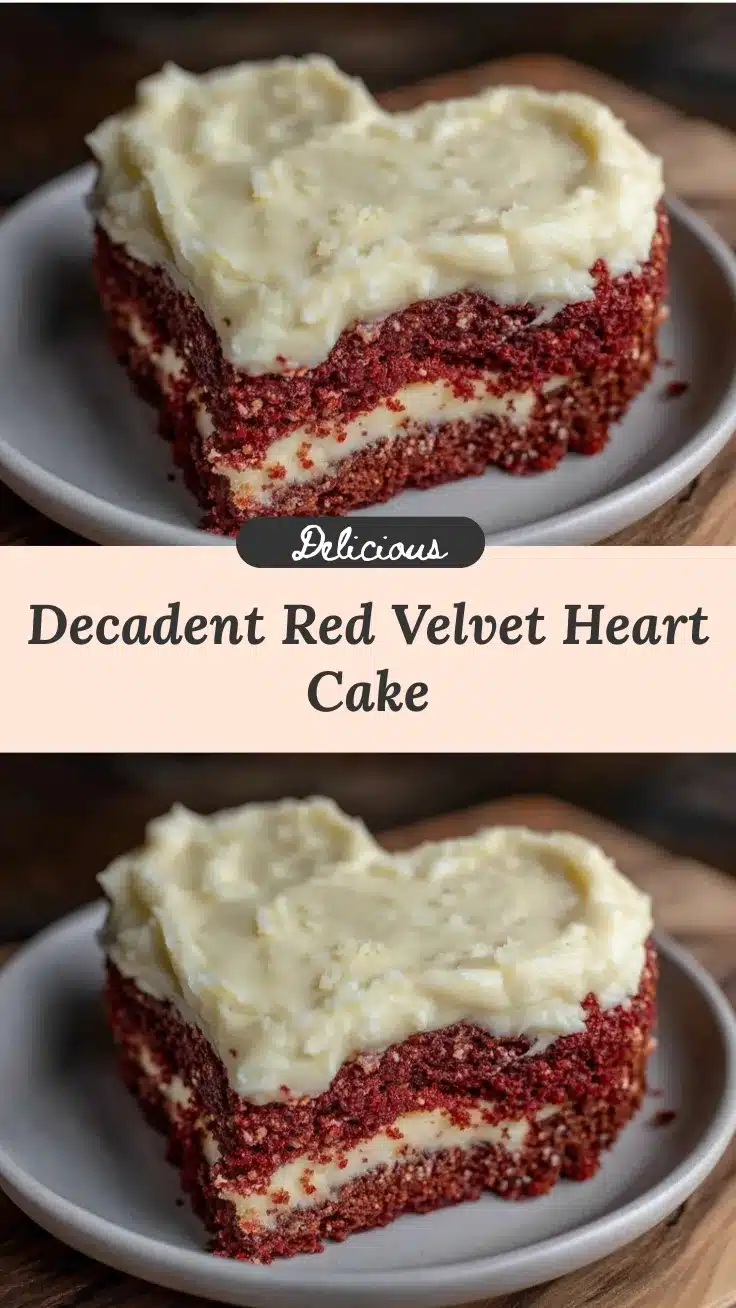
Decadent Red Velvet Heart-Shaped Layer Cake with Easy Homemade Cream Cheese Frosting

A rich, moist red velvet cake with a tangy, smooth cream cheese frosting, perfect for special occasions like Valentine’s Day or any celebration. This heart-shaped layer cake combines classic flavors with a romantic shape and easy-to-make frosting.
- Prep Time: 20 minutes
- Cook Time: 30 minutes
- Total Time: 50 minutes
- Yield: 12 servings 1x
- Category: Dessert
- Cuisine: American
Ingredients
- 2 ½ cups (312 grams) all-purpose flour, sifted
- 1 ½ cups (300 grams) granulated sugar
- 1 ½ tablespoons (12 grams) unsweetened cocoa powder, preferably Dutch-processed
- 1 teaspoon (5 grams) baking soda
- ½ teaspoon (3 grams) salt
- 1 cup (240 ml) buttermilk, room temperature (or 1 cup milk + 1 tbsp lemon juice, let sit 5 mins)
- 1 cup (240 ml) vegetable oil
- 2 large eggs, room temperature
- 1 teaspoon (5 ml) vanilla extract
- 2 tablespoons (30 ml) red food coloring, gel or liquid (gel preferred)
- 1 teaspoon (5 ml) distilled white vinegar
- 8 ounces (225 grams) cream cheese, softened
- ½ cup (115 grams) unsalted butter, softened
- 4 cups (480 grams) powdered sugar, sifted
- 1 teaspoon (5 ml) vanilla extract
- Pinch of salt
Instructions
- Preheat the oven to 350°F (175°C). Grease and flour two 8-inch heart-shaped cake pans, then line the bottoms with parchment paper.
- In a large bowl, sift together the all-purpose flour, cocoa powder, baking soda, and salt. Set aside.
- In a separate bowl, whisk together the granulated sugar, vegetable oil, and eggs until smooth and slightly thickened, about 2 minutes. Add vanilla extract and red food coloring, mixing until the color is even and vibrant.
- Slowly alternate adding the dry ingredients and buttermilk to the wet mixture, starting and ending with the dry ingredients. Mix gently but thoroughly after each addition to avoid overmixing. The batter should be smooth and pourable.
- Stir in the distilled white vinegar at the end; it will fizz slightly.
- Divide the batter evenly between the prepared pans. Tap the pans gently on the counter to release air bubbles.
- Bake for 25-30 minutes, or until a toothpick inserted in the center comes out clean. Cakes should spring back lightly when pressed.
- Remove from oven and cool in pans for 10 minutes. Then invert cakes onto cooling racks and peel off parchment paper. Let cool completely before frosting.
- To make the cream cheese frosting, beat together the softened cream cheese and butter with an electric mixer on medium speed until smooth and creamy, about 2 minutes.
- Gradually add the powdered sugar, one cup at a time, mixing on low until combined, then increase speed to medium-high and beat until fluffy, about 3-4 minutes. Add vanilla extract and salt, beating briefly to combine.
- Assemble the cake by placing one layer on a serving plate, spreading a generous amount of frosting evenly. Top with the second layer and cover the entire cake with remaining frosting. Use an offset spatula to smooth the sides and top.
- Chill the cake in the refrigerator for at least 30 minutes before serving to help the frosting set and make slicing neater.
Notes
Bring eggs and buttermilk to room temperature before starting for a smoother batter and finer crumb. Do not overmix the batter to avoid toughness. Use parchment paper in pans to prevent sticking. Chill cream cheese and butter but ensure they are soft enough to beat easily. Trim domed cake tops for even stacking. Bake layers back-to-back if possible to save time.
Nutrition
- Serving Size: 1 slice (1/12 of cak
- Calories: 375
- Sugar: 30
- Sodium: 320
- Fat: 22
- Saturated Fat: 9
- Carbohydrates: 42
- Fiber: 1
- Protein: 5
Keywords: red velvet cake, heart-shaped cake, cream cheese frosting, Valentine's Day cake, layer cake, homemade frosting, easy cake recipe