It was one of those rare, quiet evenings when the world outside felt a little too loud, and the kitchen became my refuge. I remember standing there, staring at a lonely box of red velvet cake mix that had been languishing in the pantry for weeks. Honestly, I wasn’t even sure if I felt like baking—too tired, too distracted—but then I thought, why not make something just for two? Something indulgent, intimate, and quick enough to feel like a treat rather than a chore.
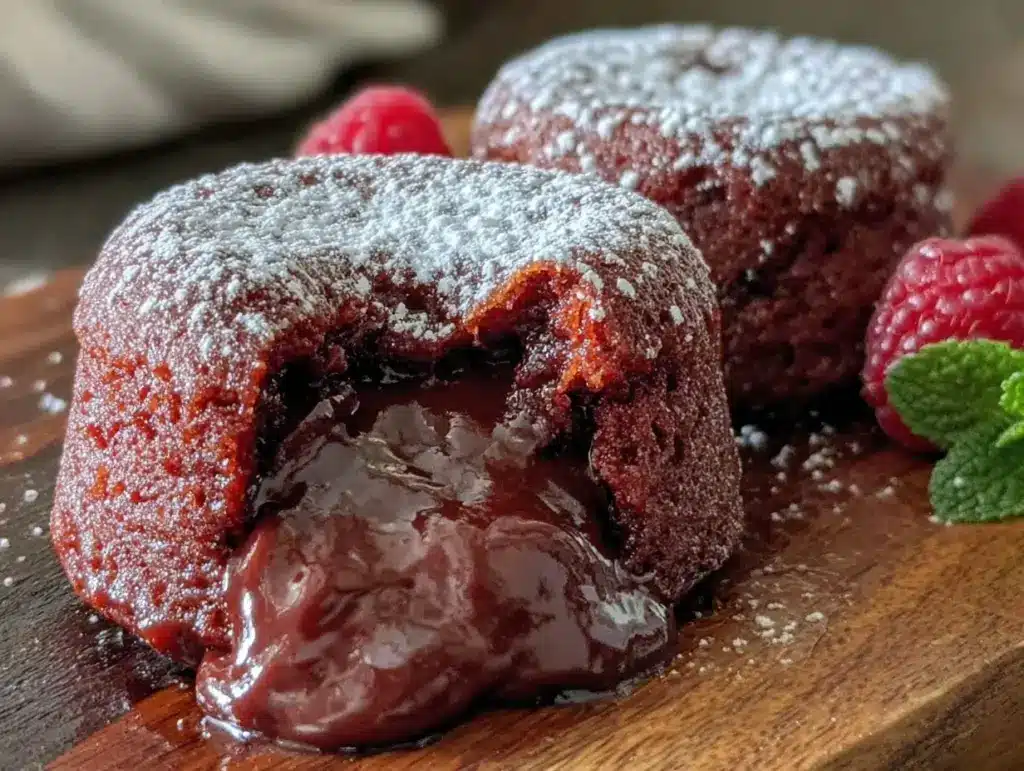
So, I improvised. From that quiet moment came these Decadent Red Velvet Molten Lava Cakes for Two. The first bite surprised me—the richness of the molten center oozing from the warm cake, the subtle tang of cream cheese swirling through, and the vibrant red crumb that just felt… festive. It wasn’t just dessert; it was comfort wrapped in a little bowl.
Since then, I’ve made these cakes countless times—sometimes for a last-minute date night, other times when I just needed a little sweetness at the end of a tough day. There’s something quietly satisfying about whipping up this dessert for two, no fuss, no leftovers, just pure indulgence. And honestly, it’s the kind of recipe that sticks with you—not because it’s fancy, but because it feels like a small celebration every single time.
Why You’ll Love This Recipe
- Quick & Easy: Ready in under 30 minutes, perfect for when you want a rich dessert without the wait.
- Simple Ingredients: Uses pantry staples you probably already have—no hunting down obscure items.
- Perfect for Cozy Nights: Designed for two, making it ideal for date nights, anniversaries, or just treating yourself.
- Crowd-Pleaser: The classic red velvet flavor paired with molten chocolate surprises everyone who tries it.
- Unique Twist: The molten lava center is enhanced with a cream cheese swirl that adds a luxurious tang and creamy texture, setting it apart from typical lava cakes.
- Unbelievably Delicious: The contrast between the warm, slightly crisp edges and the gooey center is pure magic—like a hug in dessert form.
This recipe isn’t just another chocolate cake. It’s carefully balanced with the perfect hint of cocoa and that signature red velvet tang, wrapped in a molten surprise that melts your heart (and your taste buds). Whether you’re impressing a special someone or just indulging, these lava cakes hit the spot every time.
What Ingredients You Will Need
This recipe uses simple, wholesome ingredients to deliver bold flavor and satisfying texture without the fuss. Most are pantry staples, and substitutions are easy if needed.
- Unsalted butter, 4 tablespoons (melted, plus extra for greasing)—adds richness and helps create a tender crumb.
- Granulated sugar, 1/2 cup (100g)—for sweetness and structure.
- Large egg, 1 (room temperature)—binds the ingredients and adds moisture.
- All-purpose flour, 1/3 cup (40g)—provides the cake’s structure.
- Cocoa powder, 1 tablespoon (unsweetened, preferably Dutch-processed)—for that subtle chocolate depth.
- Red food coloring, 1 tablespoon—classic red velvet vibrancy (gel works best to avoid thinning the batter).
- Vanilla extract, 1/2 teaspoon—adds warmth and rounds out the flavor.
- Salt, a pinch—to balance sweetness.
- Cream cheese, 2 tablespoons (softened)—for the molten swirl inside; I prefer Philadelphia for its smoothness.
- Powdered sugar, 1 teaspoon (optional, for dusting)—adds a delicate finish.
Substitution tips: Use almond flour for a gluten-free twist, or swap cream cheese for mascarpone for an even silkier center. If you prefer dairy-free, coconut oil can replace butter, and dairy-free cream cheese options work just fine.
Equipment Needed
- Two 6-ounce ramekins or small oven-safe bowls—to bake individual cakes perfectly sized for two.
- Mixing bowls—one for wet ingredients, one for dry.
- Whisk or hand mixer—to blend ingredients smoothly.
- Measuring cups and spoons—precision is key for the perfect texture.
- Small spatula or spoon—for swirling the cream cheese filling.
- Oven mitts—because these ramekins get hot fast!
If you don’t have ramekins, you can use small metal muffin tins lined with foil cups. I’ve found silicone molds work, but the edges don’t get quite as crisp, so I prefer the classic ceramic ones. Keeping your ramekins well-greased and lightly floured helps with easy release—trust me, scraping molten cake can be a mood killer.
Preparation Method
- Preheat your oven to 425°F (220°C) and generously butter the ramekins. Dust lightly with flour or cocoa powder to prevent sticking. This step is crucial for that clean release later.
- Prepare the cream cheese swirl: In a small bowl, mix the softened cream cheese with 1 teaspoon of powdered sugar until smooth. Set aside.
- Mix dry ingredients: In a medium bowl, sift together the flour, cocoa powder, and salt. This ensures no lumps and an even chocolate flavor.
- Combine wet ingredients: In a separate bowl, whisk the melted butter with sugar until glossy. Add the egg, vanilla extract, and red food coloring, whisking until the color is uniform and the mixture is smooth.
- Incorporate dry into wet: Gradually fold the dry ingredients into the wet mixture using a spatula. Stir gently until just combined—don’t overmix or you’ll lose that tender crumb.
- Fill the ramekins: Spoon half of the batter evenly into each ramekin. Drop a tablespoon of cream cheese mixture into the center of each, then cover with the remaining batter. Use a spoon to smooth the tops gently.
- Bake: Place the ramekins on a baking sheet and bake for 12-14 minutes. Keep an eye on them—the edges should be set and slightly firm, but the center should still look soft and jiggly. That’s your molten center waiting.
- Rest and serve: Let the cakes cool for 2-3 minutes before running a knife around the edges to loosen. Invert carefully onto plates and serve immediately. The molten core will flow out as you cut in.
Pro tip: If you bake too long, the lava center will firm up, losing that gooey magic. If it’s underbaked, the cakes can collapse when removed. Timing is everything here—trust the jiggle!
Cooking Tips & Techniques
Making molten lava cakes can seem intimidating, but a few tricks make all the difference. First, use room-temperature eggs for a smoother batter—cold eggs can cause lumps. When melting butter, go slow and avoid burning; browned butter gives a lovely nutty note but can overpower the delicate red velvet flavor.
Don’t skip sifting your cocoa and flour—that little extra step helps the cake rise evenly and prevents dense spots. I learned the hard way the first time I poured batter directly after mixing; the cake was uneven and gummy in places.
Swirling the cream cheese filling is where the magic happens. Gently fold it into the batter rather than mixing it fully in. This creates pockets of creamy tang that contrast beautifully with the rich cake.
Oven temperatures vary, so check your cakes a minute or two before the recommended bake time. The edges should be firm but not hard, and the center should wobble slightly. Multitasking here: while they bake, set your table or prepare a simple garnish like fresh berries or whipped cream.
Variations & Adaptations
- Seasonal twist: Add a teaspoon of orange zest to the batter for a bright citrus note that pairs beautifully with red velvet.
- Dietary swap: Use coconut flour and dairy-free cream cheese for a gluten-free, vegan-friendly version. Adjust the liquid slightly as coconut flour absorbs more moisture.
- Flavor boost: Fold in a handful of mini white chocolate chips into the batter for extra sweetness and texture contrast.
Personally, I’ve tried swapping the cream cheese for mascarpone once, and it made the lava center even silkier—like a velvety dream. Also, if you want to make this recipe for more than two, simply multiply ingredients, but bake in individual ramekins for best results.
Serving & Storage Suggestions
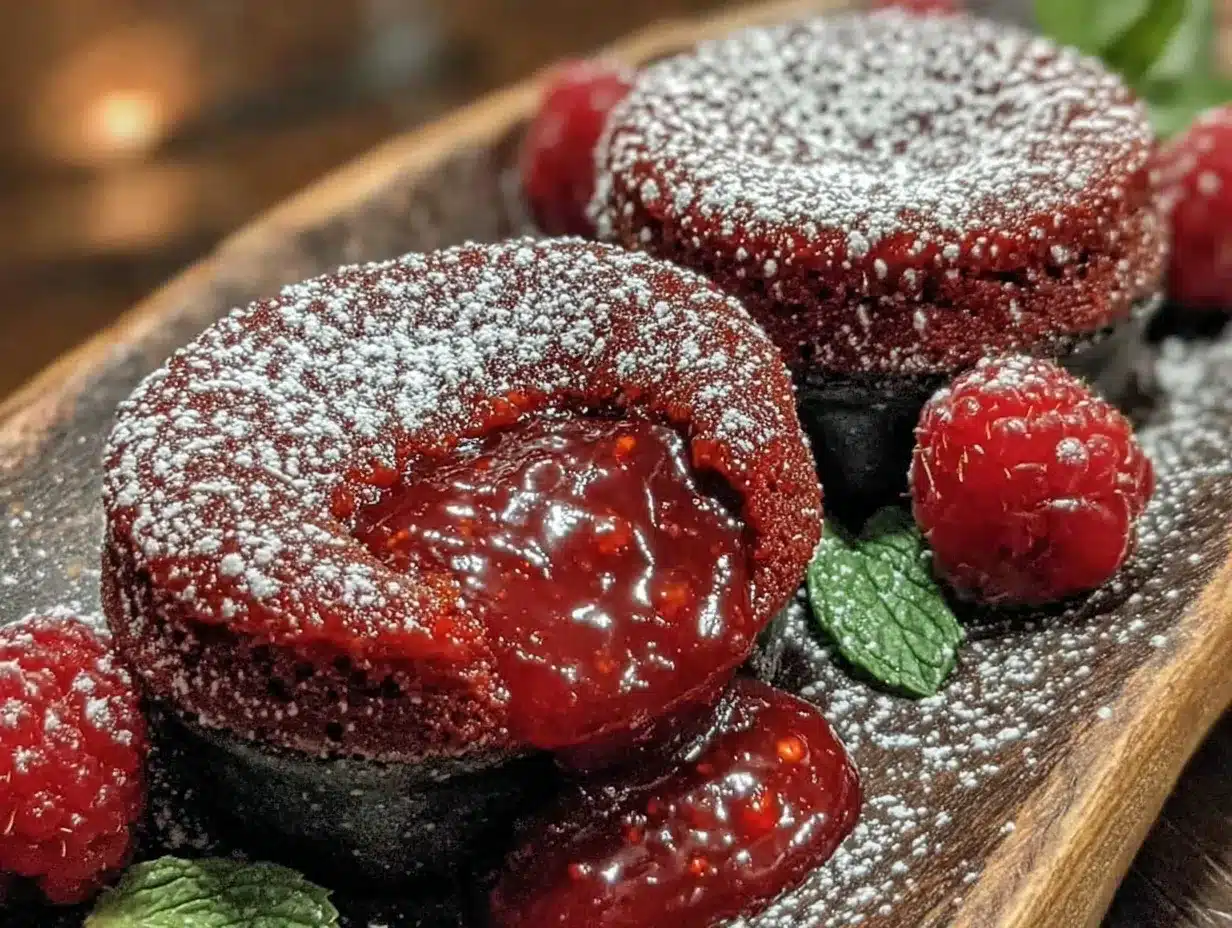
These lava cakes are best served warm, fresh out of the oven, when the molten center is still flowing. I like to dust them lightly with powdered sugar and add a few fresh raspberries or a dollop of whipped cream to balance the richness.
Pairing with a cup of strong coffee or a glass of cold milk works beautifully—something to cut through the sweetness and keep things balanced. If you want to add a festive touch, a splash of raspberry liqueur on the side is a nice adult twist.
Leftovers? Honestly, these cakes are best enjoyed immediately. But if you have any, cover and refrigerate for up to 2 days. Reheat gently in the microwave (about 20 seconds) to soften the center again. The texture won’t be quite the same, but still enjoyable.
Flavors tend to mellow overnight, so if you plan ahead, you might consider making the batter in advance and baking just before serving for that fresh, molten effect.
Nutritional Information & Benefits
Each serving of these red velvet molten lava cakes clocks in at approximately 350-400 calories, depending on ingredient brands and portion sizes. They provide a satisfying dose of energy and a little indulgence without going overboard.
Key ingredients like cocoa powder bring antioxidants, and cream cheese adds a bit of protein and calcium, making this dessert a richer experience than your average cake. Using real butter and whole eggs contributes to a creamy mouthfeel and satiety.
For those watching gluten, swapping flour with almond or coconut flour makes this a gluten-free option. Be mindful of dairy if lactose intolerant—plant-based alternatives work well here.
Conclusion
These Decadent Red Velvet Molten Lava Cakes for Two have quietly become one of my favorite ways to turn an ordinary evening into something a little more special. They’re quick, indulgent, and just the right size for sharing—or not sharing, if you’re feeling selfish. The molten cream cheese center adds that unexpected twist that keeps me coming back.
Feel free to tweak the recipe to suit your tastes—whether that’s adding a splash of espresso, swapping in different toppings, or adjusting sweetness. The best part is that it’s forgiving and straightforward, so you can focus on the joy of baking and the pleasure of eating.
If you give this recipe a try, I’d love to hear how you make it your own. Share your thoughts, questions, or creative spins—you know I’m always excited to see new takes on this cozy little dessert.
Here’s to small moments made sweeter, one molten bite at a time.
FAQs
Can I prepare these lava cakes ahead of time?
You can mix the batter and keep it in the fridge for up to 24 hours, but bake them fresh just before serving for the best molten effect.
What if I don’t have red food coloring?
Without red coloring, you’ll still get a delicious chocolate cake, but it won’t have the classic red velvet appearance. Natural alternatives like beet juice can work but may alter the flavor slightly.
How do I know when the lava cakes are done baking?
The edges should be set and slightly firm, while the center remains soft and jiggles a bit when you gently shake the ramekin.
Can these be made dairy-free or vegan?
Yes! Use dairy-free butter and cream cheese substitutes, and replace the egg with a flax egg or commercial egg replacer for a vegan version.
What is the best way to serve these lava cakes?
Serve warm, dusted with powdered sugar, and with a side of fresh berries or whipped cream to complement the rich, molten center.
Pin This Recipe!
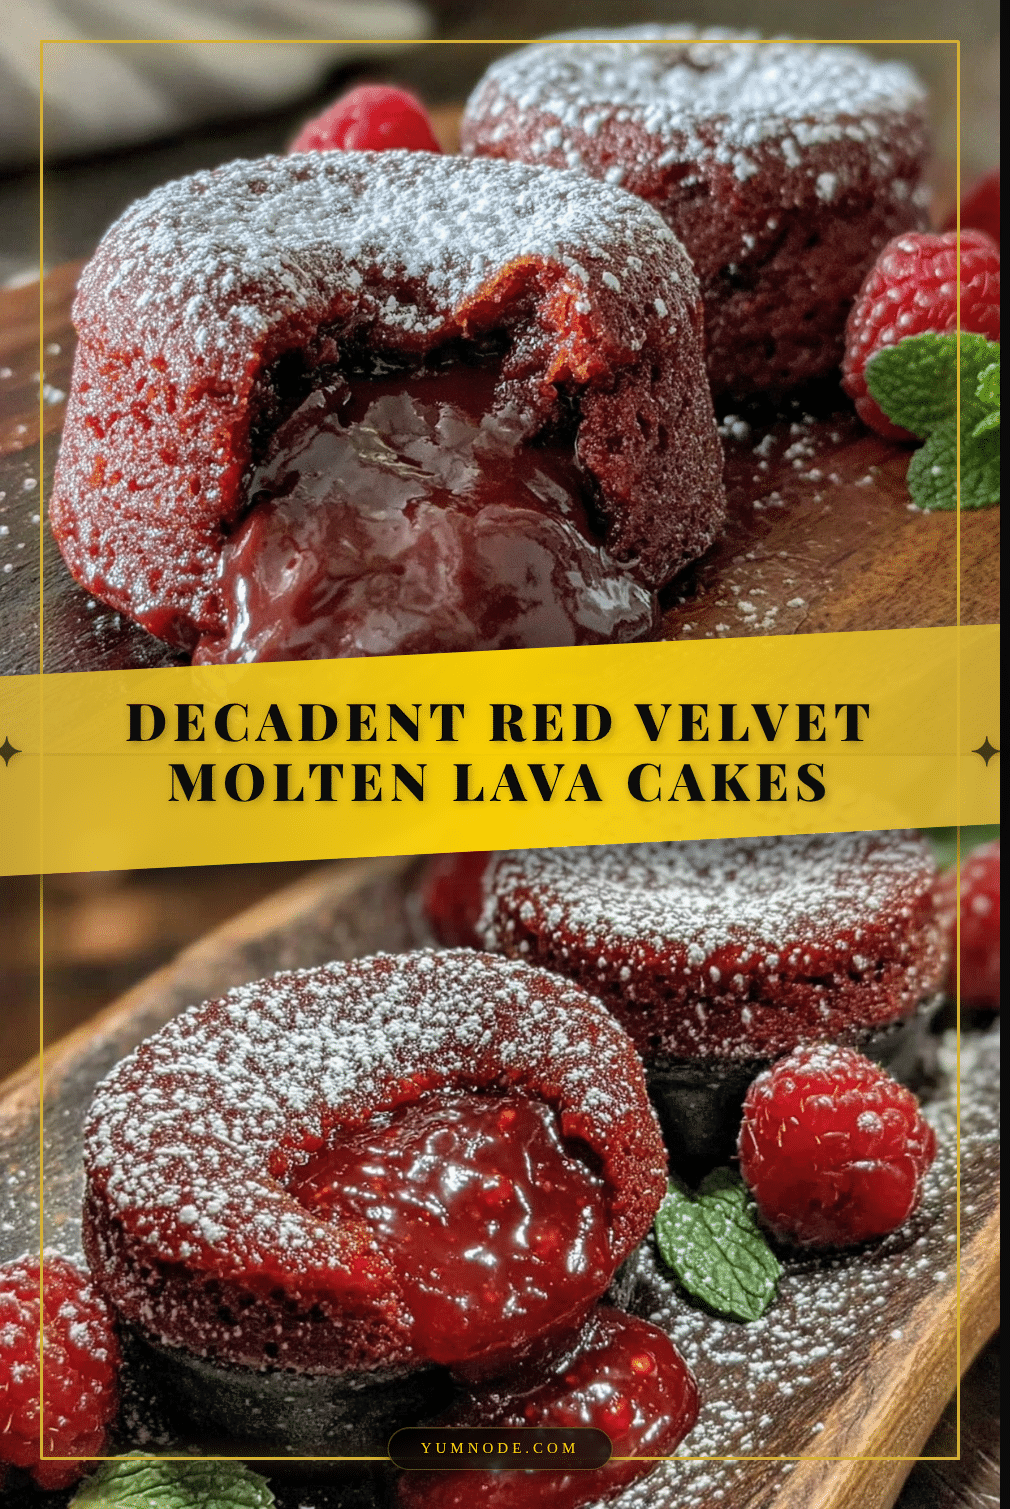
Decadent Red Velvet Molten Lava Cakes for Two

A quick and indulgent dessert recipe for two featuring rich red velvet cake with a molten cream cheese center, perfect for cozy nights or special occasions.
- Prep Time: 10 minutes
- Cook Time: 14 minutes
- Total Time: 24 minutes
- Yield: 2 servings 1x
- Category: Dessert
- Cuisine: American
Ingredients
- 4 tablespoons unsalted butter, melted (plus extra for greasing)
- 1/2 cup granulated sugar (100g)
- 1 large egg, room temperature
- 1/3 cup all-purpose flour (40g)
- 1 tablespoon unsweetened cocoa powder (preferably Dutch-processed)
- 1 tablespoon red food coloring (gel preferred)
- 1/2 teaspoon vanilla extract
- Pinch of salt
- 2 tablespoons cream cheese, softened
- 1 teaspoon powdered sugar (optional, for dusting)
Instructions
- Preheat your oven to 425°F (220°C) and generously butter the ramekins. Dust lightly with flour or cocoa powder to prevent sticking.
- Prepare the cream cheese swirl by mixing the softened cream cheese with 1 teaspoon of powdered sugar until smooth. Set aside.
- Sift together the flour, cocoa powder, and salt in a medium bowl.
- In a separate bowl, whisk the melted butter with sugar until glossy. Add the egg, vanilla extract, and red food coloring, whisking until smooth and uniform in color.
- Gradually fold the dry ingredients into the wet mixture using a spatula. Stir gently until just combined.
- Spoon half of the batter evenly into each ramekin. Drop a tablespoon of cream cheese mixture into the center of each, then cover with the remaining batter. Smooth the tops gently.
- Place the ramekins on a baking sheet and bake for 12-14 minutes until edges are set and slightly firm but centers remain soft and jiggly.
- Let the cakes cool for 2-3 minutes before running a knife around the edges to loosen. Invert carefully onto plates and serve immediately.
Notes
Use room-temperature eggs for smoother batter. Keep an eye on baking time to maintain a gooey molten center. Grease and dust ramekins well for easy release. For gluten-free, substitute almond or coconut flour. For dairy-free, use coconut oil and dairy-free cream cheese. Baking time may vary slightly depending on oven.
Nutrition
- Serving Size: 1 lava cake
- Calories: 375
- Sugar: 28
- Sodium: 210
- Fat: 22
- Saturated Fat: 13
- Carbohydrates: 38
- Fiber: 2
- Protein: 6
Keywords: red velvet, molten lava cake, dessert for two, quick dessert, cream cheese swirl, easy baking, date night dessert