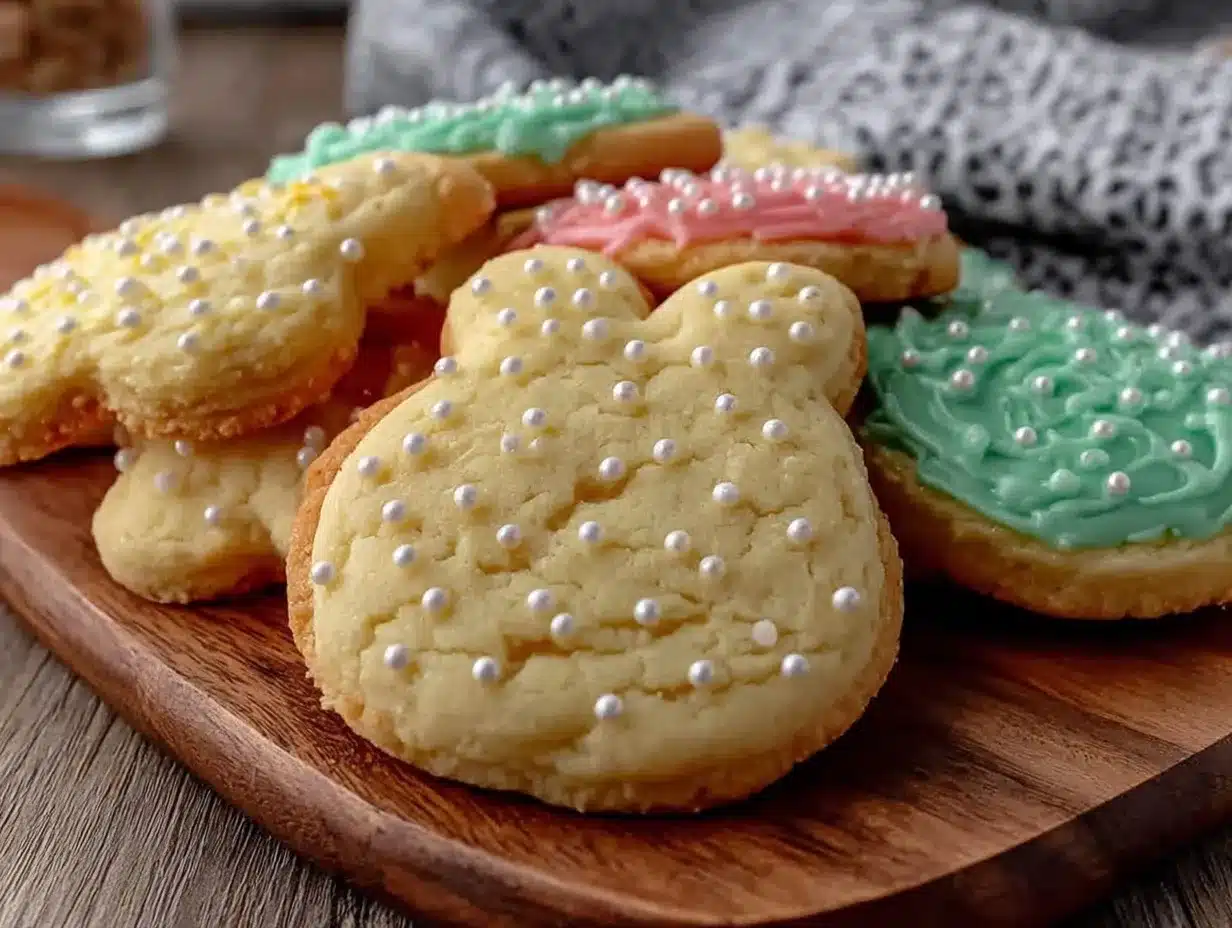
The smell of freshly baked sugar cookies with a shiny, sweet glaze instantly takes me back to childhood Easter mornings. Honestly, there’s something magical about biting into a soft, buttery cookie decorated with pastel colors and festive shapes. I first made these irresistible glazed Easter sugar cookies a few years ago when I wanted a homemade treat that was both fun and delicious for our family gathering. It quickly became a tradition—one I’ve made countless times, tweaking the glaze and dough until it felt just right.
This recipe isn’t just about sugar cookies; it’s about creating joyful memories with a treat that’s simple yet impressive. The balance between the tender cookie and the glossy glaze gives you that perfect bite every time. Whether you’re baking for kids, a spring party, or just to satisfy your sweet tooth, these glazed Easter sugar cookies bring a little extra cheer to the table. Plus, they’re surprisingly easy to make, even if you’re not a seasoned baker!
After testing this recipe multiple times (yes, I might have eaten way too many cookies in the process), I’m confident you’ll love how approachable and festive these glazed Easter sugar cookies are. They’re a sweet way to celebrate the season and share smiles with everyone around. So, grab your apron, and let’s get baking!
Why You’ll Love This Recipe
- Quick & Easy: Comes together in about 30 minutes of prep, perfect for last-minute holiday baking.
- Simple Ingredients: Uses pantry staples you probably already have—no complicated shopping required.
- Perfect for Easter & Spring: Festive shapes and pastel glaze make it ideal for holiday brunches, parties, or classroom treats.
- Crowd-Pleaser: Kids adore decorating these cookies, and adults appreciate the buttery, melt-in-your-mouth texture.
- Unbelievably Delicious: The balance of a soft, tender cookie with a sweet, glossy glaze is just next-level comfort food.
What sets this recipe apart is the glaze technique—I blend powdered sugar with just the right amount of lemon juice and milk to get a smooth, shiny finish that hardens beautifully. Plus, the dough is sturdy enough to hold intricate Easter shapes without spreading too much. I’ve played around with flours and baking times to nail down this perfect texture, and honestly, it’s the kind of cookie that gets better with every batch.
These glazed Easter sugar cookies are more than just treats; they’re a way to make the holiday a bit sweeter and more memorable. Whether you’re impressing guests or making a fun afternoon project with kids, this recipe hits all the right notes.
What Ingredients You Will Need
This recipe uses simple, wholesome ingredients to deliver bold flavor and satisfying texture without fuss. Most are pantry staples, and you can easily find substitutes if needed.
- All-purpose flour (2 ¾ cups / 345 g) – the base of the dough, gives structure
- Baking powder (1 tsp) – helps the cookies rise slightly for a tender crumb
- Salt (½ tsp) – balances sweetness and enhances flavor
- Unsalted butter (1 cup / 225 g), softened – adds richness and moisture (I recommend a quality brand like Kerrygold for best flavor)
- Granulated sugar (1 cup / 200 g) – sweetens and helps create a slight crisp edge
- Large eggs (2), room temperature – binds the dough and adds tenderness
- Vanilla extract (2 tsp) – for warm, aromatic flavor
- Milk (2 tbsp) – adds moisture and helps the dough come together
For the glaze:
- Powdered sugar (2 cups / 240 g) – the base for the glossy icing
- Milk (2-3 tbsp), plus more as needed – thins the glaze to perfect consistency
- Lemon juice (1 tbsp) – adds a subtle tang and helps the glaze harden nicely
- Food coloring (optional) – pastel shades like pink, blue, or yellow for that festive Easter vibe
Feel free to swap regular milk with almond or oat milk for a dairy-free version. For a gluten-free twist, use a 1:1 gluten-free flour blend, but note that texture may vary slightly. I usually pick small-curd butter for creaminess, and if you want a stronger vanilla punch, add an extra half teaspoon of extract. These ingredients make the cookie dough sturdy yet tender, with a sweet glaze that dries smooth and shiny every time.
Equipment Needed
- Mixing bowls: At least two — one for dry ingredients, one for wet
- Electric mixer: Handheld or stand mixer to cream butter and sugar efficiently (a wooden spoon works in a pinch, but takes more elbow grease)
- Measuring cups and spoons: For precise ingredient amounts
- Rolling pin: To roll out the dough evenly (I love silicone ones—they’re easy to clean and prevent sticking)
- Easter-themed cookie cutters: Bunnies, eggs, chicks, flowers, or whatever makes you smile
- Baking sheets: Preferably heavy-duty with a non-stick surface or lined with parchment paper
- Cooling rack: To let cookies cool completely before glazing
- Spoons or small offset spatula: For spreading glaze smoothly
If you don’t have cookie cutters, use a sharp knife or glass rim to cut shapes. A silicone baking mat can be a budget-friendly alternative to parchment paper, and a simple whisk can substitute for an electric mixer if needed. I’ve found that investing in a good rolling pin really helps achieve even thickness, which keeps baking consistent. Regularly cleaning your tools after each use keeps things smooth and prevents dough buildup.
Detailed Preparation Method
- Prepare your ingredients: Take the butter and eggs out of the fridge about 30 minutes before starting so they reach room temperature. This helps everything blend smoothly.
- Mix dry ingredients: In a medium bowl, whisk together 2 ¾ cups (345 g) all-purpose flour, 1 teaspoon baking powder, and ½ teaspoon salt. Set aside.
- Cream butter and sugar: Using an electric mixer, beat 1 cup (225 g) softened unsalted butter with 1 cup (200 g) granulated sugar on medium speed for about 3-4 minutes until light and fluffy. You’ll notice the texture becomes pale and creamy—that’s perfect.
- Add eggs and vanilla: Beat in 2 large eggs, one at a time, followed by 2 teaspoons vanilla extract. Mix until fully combined, scraping down the bowl as needed.
- Combine wet and dry: Gradually add the flour mixture in three batches, alternating with 2 tablespoons milk, mixing on low speed just until incorporated. Don’t overmix! The dough should be soft but hold together.
- Chill the dough: Wrap the dough in plastic wrap and refrigerate for at least 1 hour. This step is key to prevent spreading and helps the cookies keep their shape.
- Preheat oven to 350°F (175°C): Line baking sheets with parchment paper or silicone mats.
- Roll out dough: Lightly flour your work surface and rolling pin. Roll dough to about ¼-inch (6 mm) thickness. If it’s too sticky, chill it a bit longer.
- Cut shapes: Use your Easter-themed cookie cutters to stamp out cookies. Place them about 1 inch (2.5 cm) apart on the baking sheets.
- Bake: Bake for 8-10 minutes until edges are just starting to turn golden. The centers should still look soft—don’t overbake or they’ll dry out.
- Cool: Let cookies cool on the baking sheet for 5 minutes, then transfer to a wire rack to cool completely before glazing.
- Prepare glaze: In a small bowl, whisk together 2 cups (240 g) powdered sugar, 2 tablespoons milk, and 1 tablespoon lemon juice until smooth. Add more milk if needed for spreadable consistency. Divide and tint with food coloring if desired.
- Glaze the cookies: Use a spoon or small offset spatula to spread a thin layer of glaze over each cooled cookie. Let the glaze set at room temperature for at least 1 hour before stacking or storing.
Pro tip: If your glaze is too thick, add a few drops of milk at a time. Too thin? Add powdered sugar a little at a time. And when rolling dough, lightly flour your rolling pin too to avoid sticking.
Cooking Tips & Techniques
Getting these glazed Easter sugar cookies just right takes a bit of attention, but I’ve learned a few tricks along the way. First, chilling the dough is non-negotiable—it stops the cookies from puffing up or losing their shape in the oven. I once skipped this step and ended up with a batch that looked more like cookie blobs than cute bunnies!
When you roll out the dough, aim for even thickness. Uneven dough means some cookies bake faster and get too crunchy while others stay soft. If your kitchen is warm, chill the dough again if it starts to get sticky while cutting shapes.
For the glaze, patience is key. Spread it thinly and let it harden naturally at room temperature. Avoid stacking glazed cookies too soon or the icing will smudge. If you want a shinier finish, a thin coat of clear piping gel can help, but honestly, the lemon and powdered sugar glaze is perfect as is.
Also, use parchment or silicone mats for baking—they prevent sticking and make cleanup easier. And don’t overcrowd the baking sheet; cookies need space to bake evenly.
Lastly, multitask by preparing the glaze while cookies cool. This saves time and keeps the flow going, especially if you’re baking with kids or prepping for a party.
Variations & Adaptations
- Dietary swaps: Use a gluten-free flour blend for gluten intolerance, or swap butter for coconut oil for dairy-free options. Adjust bake time slightly if using alternative fats.
- Flavor twists: Add almond extract instead of vanilla for a nutty note, or fold in finely grated orange zest for a citrusy zing in the dough.
- Seasonal colors & shapes: Beyond Easter, use the same recipe with holiday-themed cutters and colors — think hearts for Valentine’s Day or snowflakes for winter.
- Decorations: Instead of glaze, try royal icing for detailed designs, or sprinkle with colored sugar before baking for extra sparkle.
- Personal touch: I once mixed in tiny chocolate chips for a surprise texture contrast — it was a hit with the kids!
Serving & Storage Suggestions
Serve these glazed Easter sugar cookies at room temperature for the best texture and flavor. They pair beautifully with a cup of tea, coffee, or even a glass of cold milk for the kids. For a festive presentation, arrange them on a pastel-colored platter with fresh spring flowers or edible confetti.
To store, place cookies in an airtight container layered with parchment paper to prevent sticking. They keep well at room temperature for up to 5 days, but the glaze may soften slightly over time. For longer storage, freeze unglazed cookies in a single layer, then thaw and glaze when ready to serve. If you freeze glazed cookies, the icing texture might change a bit, so I recommend glazing fresh.
Reheat gently in a warm oven (about 250°F / 120°C for 5 minutes) if you want a softer bite, but be careful not to melt the glaze. Over time, the flavors meld beautifully, making these cookies even more enjoyable the day after baking.
Nutritional Information & Benefits
One glazed Easter sugar cookie (about 2.5 inches / 6 cm) contains approximately 120 calories, 5 grams of fat, 18 grams of carbohydrates, and 1 gram of protein. While they’re definitely a treat, the recipe uses real butter and fresh ingredients, avoiding artificial additives.
The lemon juice in the glaze adds a tiny boost of vitamin C, and choosing high-quality vanilla extract brings antioxidants and rich flavor without extra sugar. For those watching carbs, consider reducing sugar slightly or swapping sugar for a natural sweetener, but keep in mind it may affect texture.
This recipe is naturally free of nuts and soy but contains gluten and dairy. With substitutions, it can be adapted for gluten-free and dairy-free diets, making it more inclusive. I appreciate these cookies as a way to celebrate holidays without complexity—simple, satisfying, and made with love.
Conclusion
These irresistible glazed Easter sugar cookies are more than just a festive treat—they’re a chance to create joyful moments and share something homemade and heartfelt. Their perfect texture, glossy glaze, and charming shapes make them a standout on any holiday table.
Feel free to customize this recipe with your favorite flavors, colors, or shapes to make it truly yours. I love baking these with my family, watching little hands decorate, and seeing smiles light up the room. It’s a sweet tradition I hope you’ll enjoy as much as I do.
Give this recipe a try, and don’t forget to share your cookie creations or twists in the comments below—I’m always excited to hear your stories! Happy baking and happy Easter!
FAQs
- Can I make the dough ahead of time? Yes! You can prepare the dough and refrigerate it up to 2 days before baking. Just let it soften slightly before rolling out.
- How do I prevent the cookies from spreading too much? Chilling the dough for at least an hour before rolling helps maintain the shapes during baking. Also, avoid too much butter or overmixing.
- What if I don’t have Easter cookie cutters? No worries! Use any small cookie cutter shapes you have or cut shapes freehand with a knife.
- How do I store glazed cookies to keep the icing intact? Store in a single layer in an airtight container at room temperature. Avoid stacking until glaze fully hardens (about 1 hour).
- Can I use royal icing instead of the glaze? Absolutely! Royal icing works great for detailed decorating and dries hard. Just keep in mind it requires drying time and a slightly different technique.
Pin This Recipe!

Irresistible Glazed Easter Sugar Cookies

Soft, buttery sugar cookies with a shiny, sweet glaze perfect for Easter celebrations. Easy to make and decorated with festive pastel colors and shapes.
- Prep Time: 30 minutes
- Cook Time: 10 minutes
- Total Time: 1 hour 40 minutes
- Yield: 24 cookies 1x
- Category: Dessert
- Cuisine: American
Ingredients
- 2 ¾ cups (345 g) all-purpose flour
- 1 tsp baking powder
- ½ tsp salt
- 1 cup (225 g) unsalted butter, softened
- 1 cup (200 g) granulated sugar
- 2 large eggs, room temperature
- 2 tsp vanilla extract
- 2 tbsp milk
- For the glaze:
- 2 cups (240 g) powdered sugar
- 2–3 tbsp milk, plus more as needed
- 1 tbsp lemon juice
- Food coloring (optional)
Instructions
- Take the butter and eggs out of the fridge about 30 minutes before starting so they reach room temperature.
- In a medium bowl, whisk together 2 ¾ cups (345 g) all-purpose flour, 1 teaspoon baking powder, and ½ teaspoon salt. Set aside.
- Using an electric mixer, beat 1 cup (225 g) softened unsalted butter with 1 cup (200 g) granulated sugar on medium speed for about 3-4 minutes until light and fluffy.
- Beat in 2 large eggs, one at a time, followed by 2 teaspoons vanilla extract. Mix until fully combined.
- Gradually add the flour mixture in three batches, alternating with 2 tablespoons milk, mixing on low speed just until incorporated. Do not overmix.
- Wrap the dough in plastic wrap and refrigerate for at least 1 hour.
- Preheat oven to 350°F (175°C). Line baking sheets with parchment paper or silicone mats.
- Lightly flour your work surface and rolling pin. Roll dough to about ¼-inch (6 mm) thickness.
- Use Easter-themed cookie cutters to cut shapes. Place cookies about 1 inch (2.5 cm) apart on baking sheets.
- Bake for 8-10 minutes until edges start to turn golden but centers remain soft.
- Let cookies cool on the baking sheet for 5 minutes, then transfer to a wire rack to cool completely.
- In a small bowl, whisk together 2 cups (240 g) powdered sugar, 2 tablespoons milk, and 1 tablespoon lemon juice until smooth. Add more milk if needed for spreadable consistency. Tint with food coloring if desired.
- Use a spoon or small offset spatula to spread a thin layer of glaze over each cooled cookie.
- Let the glaze set at room temperature for at least 1 hour before stacking or storing.
Notes
Chilling the dough for at least 1 hour is essential to prevent spreading and maintain cookie shapes. Spread glaze thinly and allow to harden at room temperature for best results. Use parchment or silicone mats to prevent sticking. Dough can be refrigerated up to 2 days before baking. For dairy-free, swap butter with coconut oil and milk with almond or oat milk. For gluten-free, use a 1:1 gluten-free flour blend but expect slight texture differences.
Nutrition
- Serving Size: 1 cookie (about 2.5
- Calories: 120
- Fat: 5
- Carbohydrates: 18
- Protein: 1
Keywords: Easter sugar cookies, glazed sugar cookies, festive cookies, homemade sugar cookies, Easter treats, pastel cookies, holiday baking