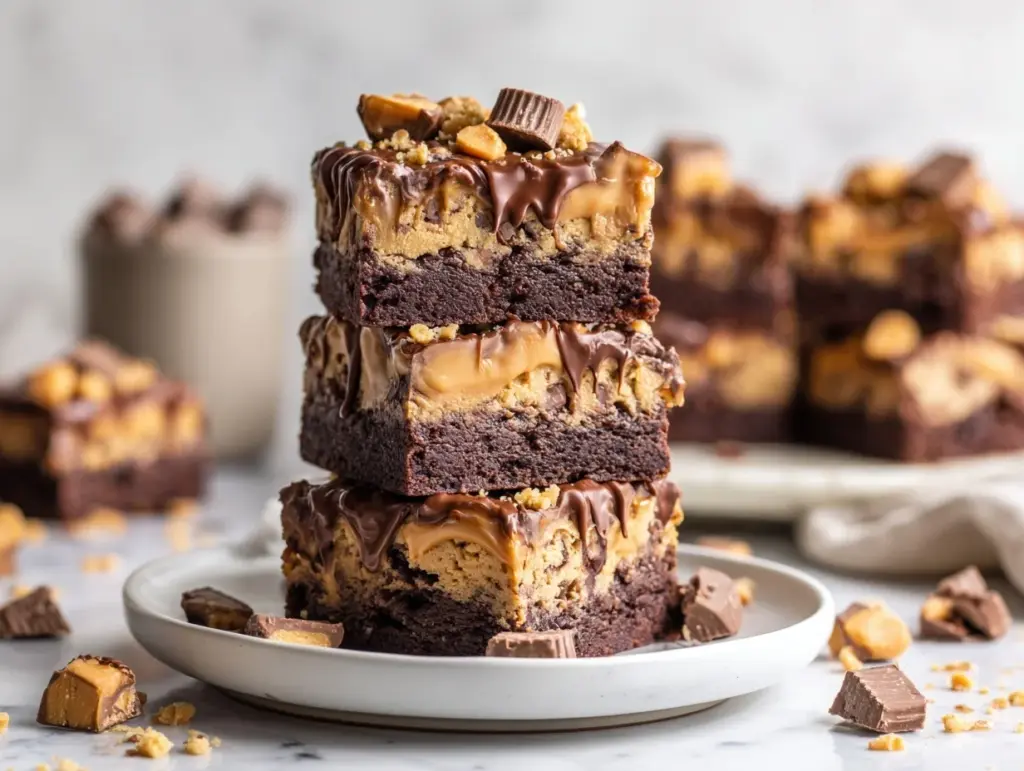
The moment you slice into these loaded peanut butter brownie cookie dough bars, you’ll know you’re in for something special. Imagine a fudgy brownie base, a thick layer of edible cookie dough swirled with mini chocolate chips, and heaps of peanut butter that tie everything together. Honestly, every bite is a chocolate-and-peanut-butter lover’s dream come true. These bars are no-bake, which means no oven drama, no waiting around in a hot kitchen, and definitely no worries about underbaked centers. If you love the idea of sneaking a spoonful of cookie dough (who doesn’t?) and want a decadent treat that still feels a little playful, this recipe is going to be your new go-to.
I came up with these loaded peanut butter brownie cookie dough bars during a particularly snacky afternoon with my kids—they love anything with chocolate and peanut butter, and I love recipes that don’t require a lot of fuss. My first attempt was a bit of a happy accident: I had leftover brownies and a bowl of edible cookie dough, so I figured, why not combine them? After a few tweaks and a generous scoop of peanut butter, these bars were born. They quickly became a family favorite, especially for birthday parties, sleepovers, or just a Friday night treat.
Let’s face it, we all crave something sweet and comforting now and then. The best part is, these loaded peanut butter brownie cookie dough bars are ridiculously easy to make—no fancy ingredients, no baking, and you can even get creative with the toppings. Whether you’re making them for a crowd or just to stash in the fridge for late-night cravings, you’ll love how satisfying and downright fun they are to eat. Trust me, after making this recipe at least a dozen times (and tweaking it along the way), I can say with confidence: this is the ultimate no-bake dessert for peanut butter and chocolate fans everywhere.
Why You’ll Love This Recipe
- Quick & Easy: These bars come together in under 30 minutes (plus chilling time). Seriously, you barely need to plan ahead—perfect for last-minute dessert emergencies!
- No-Bake Convenience: No oven needed, so you can whip these up even on the hottest days. I’ve made them in the middle of summer without breaking a sweat.
- Simple Ingredients: Everything you need is probably in your pantry right now. No obscure baking powders or expensive chocolate—just the classics.
- Loaded with Flavor: The combination of fudgy brownies, creamy peanut butter, and cookie dough is basically irresistible. Each bite is sweet, salty, and super satisfying.
- Perfect for All Occasions: Great for birthday parties, potlucks, cozy movie nights, or whenever you want to impress with minimal effort.
- Customizable: Add your favorite candy, use crunchy or creamy peanut butter, or swap in gluten-free flour for an allergy-friendly twist.
- Crowd-Pleaser: I’ve made these for bake sales and family gatherings, and they disappear fast—kids and adults both go back for seconds (if there’s any left at all).
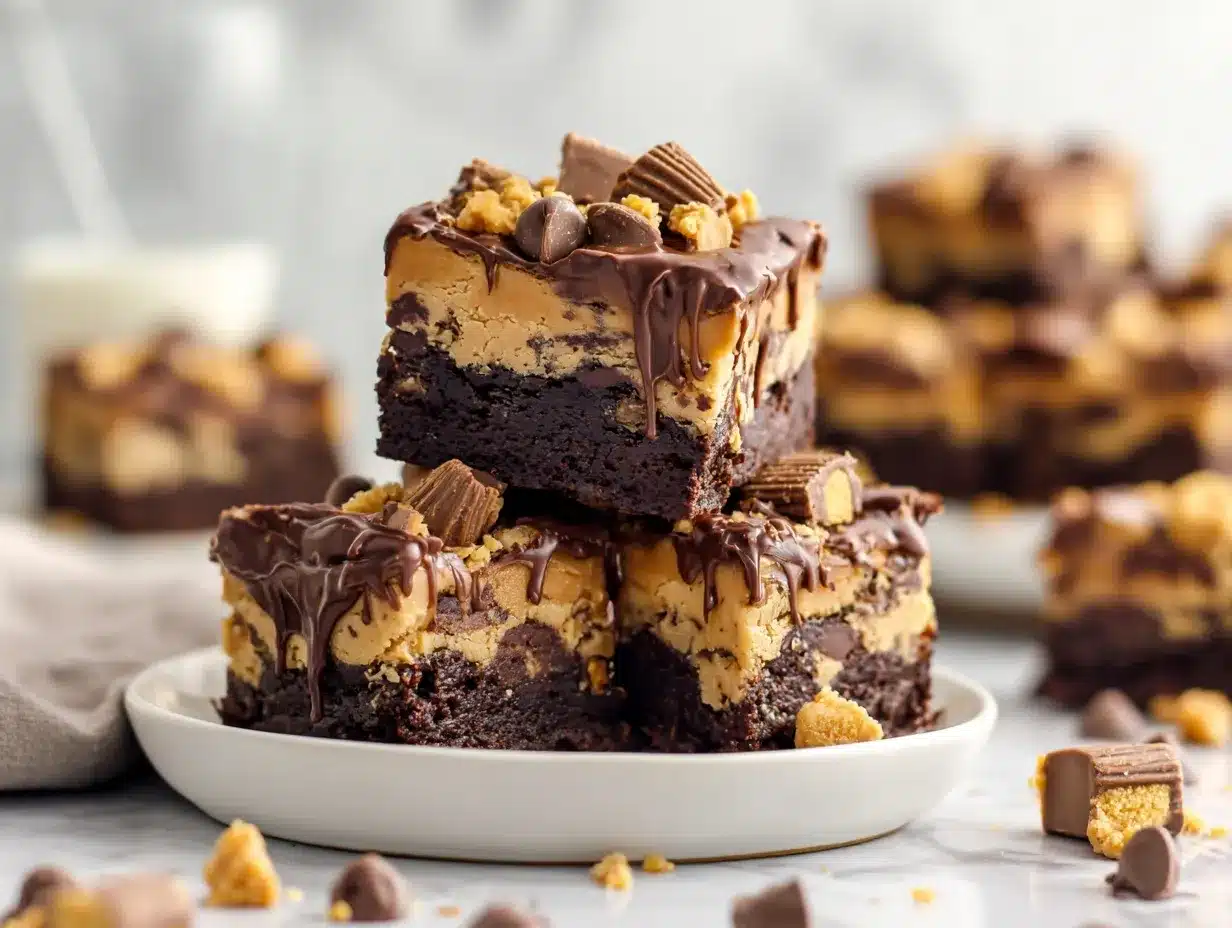
What really sets these loaded peanut butter brownie cookie dough bars apart is the layering technique. Instead of just mixing everything together, you get distinct layers—each with its own flavor and texture. The brownie base is dense and chocolatey, the cookie dough is rich and studded with chocolate chips, and the peanut butter ties it all together with a creamy, salty note. It’s comfort food at its best: familiar flavors, but in a format that feels a little extra special. Plus, since everything is no-bake, you don’t have to worry about dry brownies or raw eggs in your cookie dough. Just pure, indulgent goodness—every single time.
What Ingredients You Will Need
This recipe uses simple, wholesome ingredients to deliver bold flavor and a satisfying texture—no fancy stuff, just the good stuff you love. Everything here is easy to find, and substitutions are a breeze if you need to switch things up.
- For the Brownie Base:
- 1 box brownie mix (about 18 oz/510 g) – use your favorite brand or homemade if you want
- 1/3 cup (80 ml) unsalted butter, melted (adds richness and holds the base together)
- 2-3 tablespoons (30-45 ml) milk (adjust as needed for consistency)
- For the Peanut Butter Layer:
- 3/4 cup (180 g) creamy peanut butter (or use crunchy if you like texture)
- 2 tablespoons (30 g) unsalted butter, softened
- 1/2 cup (60 g) powdered sugar
- 1/2 teaspoon vanilla extract
- Pinch of salt (balances the sweetness)
- For the Edible Cookie Dough Layer:
- 1/2 cup (115 g) unsalted butter, softened
- 2/3 cup (130 g) brown sugar, packed
- 1/4 cup (50 g) granulated sugar
- 2 tablespoons (30 ml) milk (any kind)
- 1 teaspoon vanilla extract
- 1 cup (125 g) all-purpose flour (heat-treated for safety)
- 1/2 teaspoon salt
- 1 cup (170 g) mini chocolate chips (I use Ghirardelli for meltiness)
- For the Loaded Topping:
- 1/2 cup (85 g) chopped peanut butter cups or mini peanut butter candies
- 1/3 cup (55 g) extra chocolate chips (for extra melty goodness)
- 1/4 cup (35 g) chopped roasted peanuts (optional, adds crunch)
- Drizzle of melted chocolate or peanut butter (totally optional but looks great)
Ingredient Tips: Use full-fat, shelf-stable peanut butter for the creamiest results. For the brownie base, you can swap in gluten-free brownie mix or even a homemade brownie recipe if you’re feeling ambitious. If you need to make the cookie dough dairy-free, substitute vegan butter and plant-based milk. For nut allergies, use sunflower seed butter or Wowbutter—both work like a charm.
Equipment Needed
- 8×8-inch (20×20 cm) Baking Pan: The perfect size for thick, decadent bars. You can use a 9×9-inch pan for slightly thinner bars if that’s what you have.
- Parchment Paper: Makes removing and slicing the bars so much easier—trust me, I’ve tried it without and regretted it.
- Mixing Bowls: At least two—one for each main layer. If you only have one, just rinse it out between layers.
- Hand Mixer or Stand Mixer: For creaming the butters and sugars together. You can do it by hand with a sturdy spatula, but your arms will get a workout!
- Measuring Cups & Spoons: I love my stainless steel set, but any accurate set will do the trick.
- Spatula: For spreading layers evenly and scraping every bit of delicious dough from the bowl.
- Microwave-Safe Bowl: For melting chocolate or butter if you want to drizzle the top.
- Sharp Knife: For clean slices—run it under hot water and wipe between cuts for the neatest bars.
If you’re just starting out, don’t stress about fancy gear. I’ve used a glass baking dish and a wooden spoon before, and the bars still turned out amazing. Just line your pan well so the layers don’t stick, and make sure your butter is soft for easy mixing. If you’re a fan of silicone spatulas, they really do make spreading those thick layers a breeze—and they’re a cinch to clean!
How to Make Loaded Peanut Butter Brownie Cookie Dough Bars
-
Prepare the Brownie Base:
- In a medium bowl, combine 1 box (18 oz/510 g) brownie mix with 1/3 cup (80 ml) melted unsalted butter. Stir until the mixture is thick and crumbly.
- Add 2–3 tablespoons (30–45 ml) milk, a bit at a time, until the dough comes together and is spreadable but still thick. It should look like classic brownie batter but a bit firmer.
- Press the brownie mixture evenly into a parchment-lined 8×8-inch (20×20 cm) pan. Use the bottom of a measuring cup or spatula to smooth the surface.
- Chill in the fridge for 10 minutes while you prep the next layer.
-
Make the Peanut Butter Layer:
- In a clean bowl, beat 3/4 cup (180 g) creamy peanut butter and 2 tablespoons (30 g) softened butter until smooth and fluffy.
- Add 1/2 cup (60 g) powdered sugar, 1/2 teaspoon vanilla extract, and a pinch of salt. Beat until creamy and thick.
- Spread the peanut butter mixture over the chilled brownie base. Use an offset spatula for a neat, even layer.
- Place the pan back in the fridge to let this layer firm up while you make the next.
-
Whip Up the Edible Cookie Dough Layer:
- Before you start, heat-treat the flour: spread 1 cup (125 g) all-purpose flour on a baking sheet and bake at 350°F (175°C) for 5 minutes. Cool completely—it helps keep the dough safe to eat raw.
- In a mixing bowl, cream 1/2 cup (115 g) softened butter, 2/3 cup (130 g) brown sugar, and 1/4 cup (50 g) granulated sugar until light and fluffy (about 2 minutes).
- Mix in 2 tablespoons (30 ml) milk and 1 teaspoon vanilla extract. Beat until smooth.
- Add the cooled, heat-treated flour and 1/2 teaspoon salt. Mix until just combined—it’ll look like classic cookie dough.
- Fold in 1 cup (170 g) mini chocolate chips.
- Gently spread the cookie dough over the peanut butter layer. It helps to dollop it in small spoonfuls and then press it flat with your spatula.
-
Load Up the Topping:
- Scatter 1/2 cup (85 g) chopped peanut butter cups, 1/3 cup (55 g) extra chocolate chips, and 1/4 cup (35 g) roasted peanuts over the top. Press them in gently so they stick.
- If you want, drizzle melted chocolate or peanut butter over everything for a bakery-worthy finish.
-
Chill and Slice:
- Cover the pan and chill for at least 2 hours, or until the bars are firm enough to slice cleanly. Overnight is even better for perfect layers!
- Remove from the pan using the parchment paper “handles.” Slice with a sharp knife, wiping the blade between cuts for neat squares.
- Serve chilled or at room temperature. Watch them vanish!
Preparation Tips: If the dough sticks to your spatula, just wet it slightly for easier spreading. If your layers seem soft, give them more fridge time—patience pays off for those sharp, bakery-style layers. And if your cookie dough looks crumbly, add another splash of milk until it holds together.
Cooking Tips & Techniques
- Chill Between Layers: Don’t rush the chilling between each layer—it helps keep the bars neat and prevents the layers from blending together. I once tried to speed things up, and my layers got all swirled together. Still tasty, just not as pretty!
- Heat-Treat Your Flour: Always heat-treat the flour for the cookie dough. It’s a tiny step, but it makes the dough safe to eat and gives you peace of mind (especially when sharing with kids).
- Mix Gently: When folding in chocolate chips or candies, do it by hand. Over-mixing can make the dough tough or squish the chips.
- Sharp Slices: For perfect bars, use a long, sharp knife, and clean it between each cut. Running the blade under hot water helps, especially with sticky toppings.
- Room Temperature Ingredients: Let your butter and peanut butter come to room temp before starting. This makes everything mix up smoother and gives you that dreamy, fluffy texture in each layer.
- Customize the Toppings: Don’t be afraid to add your own spin—pretzels, toffee bits, or even a sprinkle of flaky sea salt can be amazing!
I’ve had my fair share of mishaps with these bars—like forgetting to heat-treat the flour (oops) or slicing too soon and ending up with a gooey mess. If that happens, just pop them back in the fridge and try again later. For multitasking, I like to prep each layer while the previous one is chilling, so everything comes together quickly. The biggest lesson I’ve learned: patience is your friend here. The longer you chill, the more bakery-perfect your bars will be!
Variations & Adaptations
- Gluten-Free Version: Swap in gluten-free brownie mix and use a gluten-free flour blend for the cookie dough. I’ve done this for my best friend’s birthday, and no one could tell the difference.
- Nut-Free Option: Use sunflower seed butter or Wowbutter in place of peanut butter, and skip the chopped peanuts on top. Make sure your chocolate chips are nut-free too.
- Vegan Twist: Substitute vegan butter, plant-based milk, and a vegan brownie mix. Use dairy-free chocolate chips and vegan-friendly candies for the topping. The bars stay just as delicious and chewy.
- Flavor Switch-Up: Add a swirl of caramel sauce to the peanut butter layer, or sprinkle in crushed pretzels for a salty-sweet crunch. Around the holidays, I like to add red and green candies for a festive look!
- Single-Serve Mini Bars: Press the layers into lined muffin tins for individual portions—great for parties or lunchboxes.
One of my favorite variations is adding chopped Oreos to the cookie dough layer for a cookies-and-cream vibe. You can also mix and match the candy toppings depending on what’s in your pantry. Don’t be afraid to play around—these bars are super forgiving and totally customizable!
Serving & Storage Suggestions
These loaded peanut butter brownie cookie dough bars are best served chilled or at cool room temperature—they hold their shape and each bite is perfectly fudgy. For a party platter, slice into small squares and stack them for a jaw-dropping dessert display. If you’re feeling fancy, drizzle extra melted chocolate or peanut butter over the bars just before serving.
Pair with a cold glass of milk, a cup of strong coffee, or even a scoop of vanilla ice cream for the ultimate treat. For celebrations, I like to add a sprinkle of rainbow sprinkles or festive candies on top—makes them even more fun for kids.
To store, keep the bars in an airtight container in the refrigerator for up to one week. They also freeze beautifully—just wrap individual bars in parchment and freeze in a zip-top bag for up to two months. Let them thaw in the fridge overnight or at room temperature for about 30 minutes before serving. The flavors actually meld and get even better after a day or two, so don’t worry about making them ahead!
Nutritional Information & Benefits
Each loaded peanut butter brownie cookie dough bar is estimated to have about 320 calories, with 5 grams of protein, 18 grams of fat, and 36 grams of carbohydrates per square (assuming 16 bars per batch). The peanut butter brings healthy fats and a little protein, while the oats and flour add fiber and heartiness. Chocolate chips and candies add joy—hey, balance matters!
These bars are naturally vegetarian and can be easily adapted for gluten-free or vegan diets with a few swaps. If you’re watching allergens, remember that classic peanut butter, flour, and dairy are present here—but substitutions are simple. For me, enjoying treats like this in moderation fits perfectly into a balanced lifestyle. They’re satisfying enough that one square really does the trick, and sharing them makes any occasion feel special.
Conclusion
Loaded peanut butter brownie cookie dough bars aren’t just another dessert—they’re the kind you remember, crave, and can’t wait to make again. With layers of fudgy brownie, creamy peanut butter, and irresistible cookie dough, these bars are pure comfort with a playful twist. Easy enough for beginners but impressive for a crowd, you’ll come back to this recipe over and over.
Don’t be afraid to make it your own—swap the toppings, try a new nut butter, or add your favorite candies. I love this recipe because it brings people together (and because I can make it with my kids on a whim). If you give it a try, let me know in the comments how you made it your own, or share a photo on Pinterest or Instagram. Happy baking—and even happier snacking!
Frequently Asked Questions
Can I use homemade brownies instead of a boxed mix?
Absolutely! Just use your favorite homemade brownie recipe for the base—just make sure it’s a fudgy, not cakey, texture and let it cool before layering on the peanut butter and cookie dough.
Is the cookie dough layer safe to eat raw?
Yes, as long as you heat-treat the flour and use no eggs, the cookie dough is safe to eat raw. Always cool the flour completely before mixing it into the dough.
Can I make these bars ahead of time?
Definitely. These bars actually taste even better after chilling overnight, so they’re perfect for making ahead for parties or special occasions.
What’s the best way to cut the bars cleanly?
Use a sharp knife, run it under hot water, and wipe it clean between each cut. Chilling the bars well before slicing also helps keep those layers neat.
How do I make this recipe nut-free?
Swap peanut butter for sunflower seed butter or Wowbutter, skip the peanuts on top, and make sure all other ingredients are nut-free. You’ll still get all that creamy, chewy, chocolatey goodness!
PrintLoaded Peanut Butter Brownie Cookie Dough Bars

These no-bake bars feature a fudgy brownie base, a thick layer of edible chocolate chip cookie dough, and a creamy peanut butter layer, all topped with candies and chocolate. Perfect for chocolate and peanut butter lovers, they’re easy to make and ideal for parties or late-night treats.
- Prep Time: 25 minutes
- Cook Time: 5 minutes (for heat-treating flour)
- Total Time: 2 hours 30 minutes (including chilling)
- Yield: 16 bars 1x
- Category: Dessert
- Cuisine: American
Ingredients
- 1 box brownie mix (about 18 oz)
- 1/3 cup unsalted butter, melted
- 2–3 tablespoons milk
- 3/4 cup creamy peanut butter
- 2 tablespoons unsalted butter, softened
- 1/2 cup powdered sugar
- 1/2 teaspoon vanilla extract
- Pinch of salt
- 1/2 cup unsalted butter, softened
- 2/3 cup brown sugar, packed
- 1/4 cup granulated sugar
- 2 tablespoons milk
- 1 teaspoon vanilla extract
- 1 cup all-purpose flour (heat-treated)
- 1/2 teaspoon salt
- 1 cup mini chocolate chips
- 1/2 cup chopped peanut butter cups or mini peanut butter candies
- 1/3 cup extra chocolate chips
- 1/4 cup chopped roasted peanuts (optional)
- Drizzle of melted chocolate or peanut butter (optional)
Instructions
- Line an 8×8-inch baking pan with parchment paper.
- In a medium bowl, combine brownie mix and melted butter. Stir until thick and crumbly.
- Add milk, a tablespoon at a time, until the mixture is spreadable but thick.
- Press brownie mixture evenly into the prepared pan. Smooth the surface.
- Chill in the fridge for 10 minutes.
- In a clean bowl, beat peanut butter and softened butter until smooth and fluffy.
- Add powdered sugar, vanilla extract, and a pinch of salt. Beat until creamy and thick.
- Spread peanut butter mixture over the chilled brownie base. Chill again.
- Heat-treat flour for the cookie dough: spread flour on a baking sheet and bake at 350°F for 5 minutes. Cool completely.
- In a mixing bowl, cream softened butter, brown sugar, and granulated sugar until light and fluffy.
- Mix in milk and vanilla extract until smooth.
- Add cooled, heat-treated flour and salt. Mix until just combined.
- Fold in mini chocolate chips.
- Gently spread cookie dough over the peanut butter layer.
- Scatter chopped peanut butter cups, extra chocolate chips, and peanuts over the top. Press gently.
- Drizzle with melted chocolate or peanut butter if desired.
- Cover and chill for at least 2 hours, or until firm.
- Remove from pan using parchment paper. Slice with a sharp knife, wiping between cuts.
- Serve chilled or at room temperature.
Notes
Chill each layer thoroughly for clean slices. Always heat-treat flour for safe edible cookie dough. Customize toppings with your favorite candies or nuts. For gluten-free or vegan adaptations, substitute appropriate mixes and butters.
Nutrition
- Serving Size: 1 bar (1/16 of pan)
- Calories: 320
- Sugar: 24
- Sodium: 180
- Fat: 18
- Saturated Fat: 8
- Carbohydrates: 36
- Fiber: 2
- Protein: 5
Keywords: no bake, peanut butter, brownie, cookie dough, dessert bars, chocolate, easy dessert, party treat, kid friendly, layered bars



