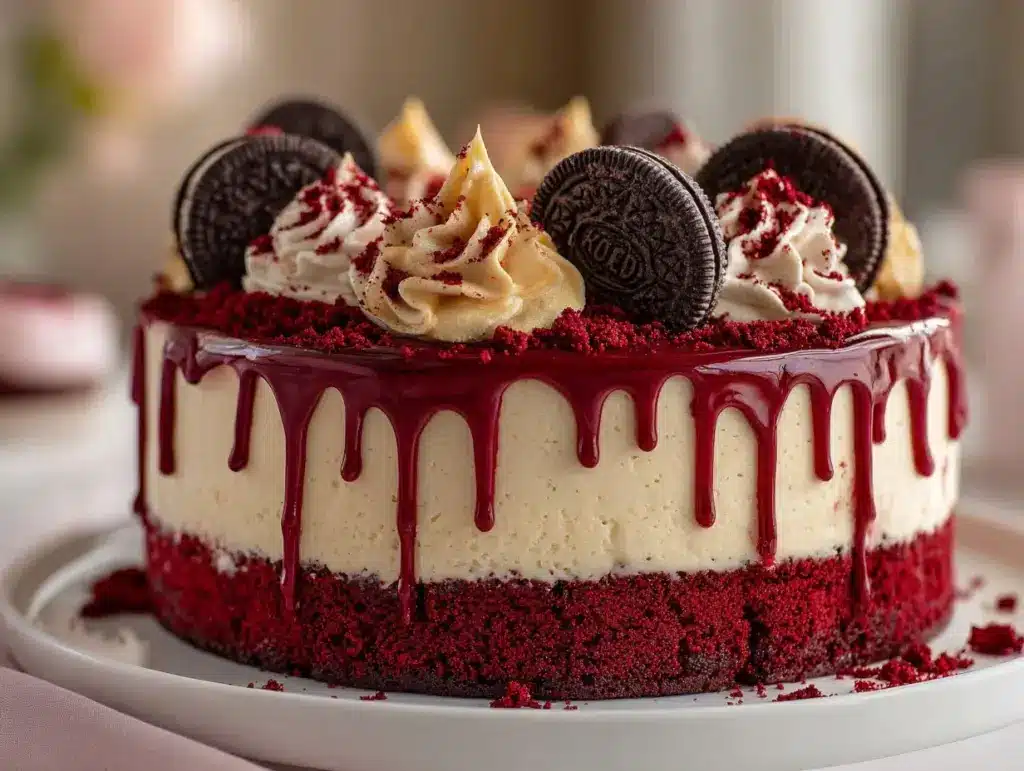
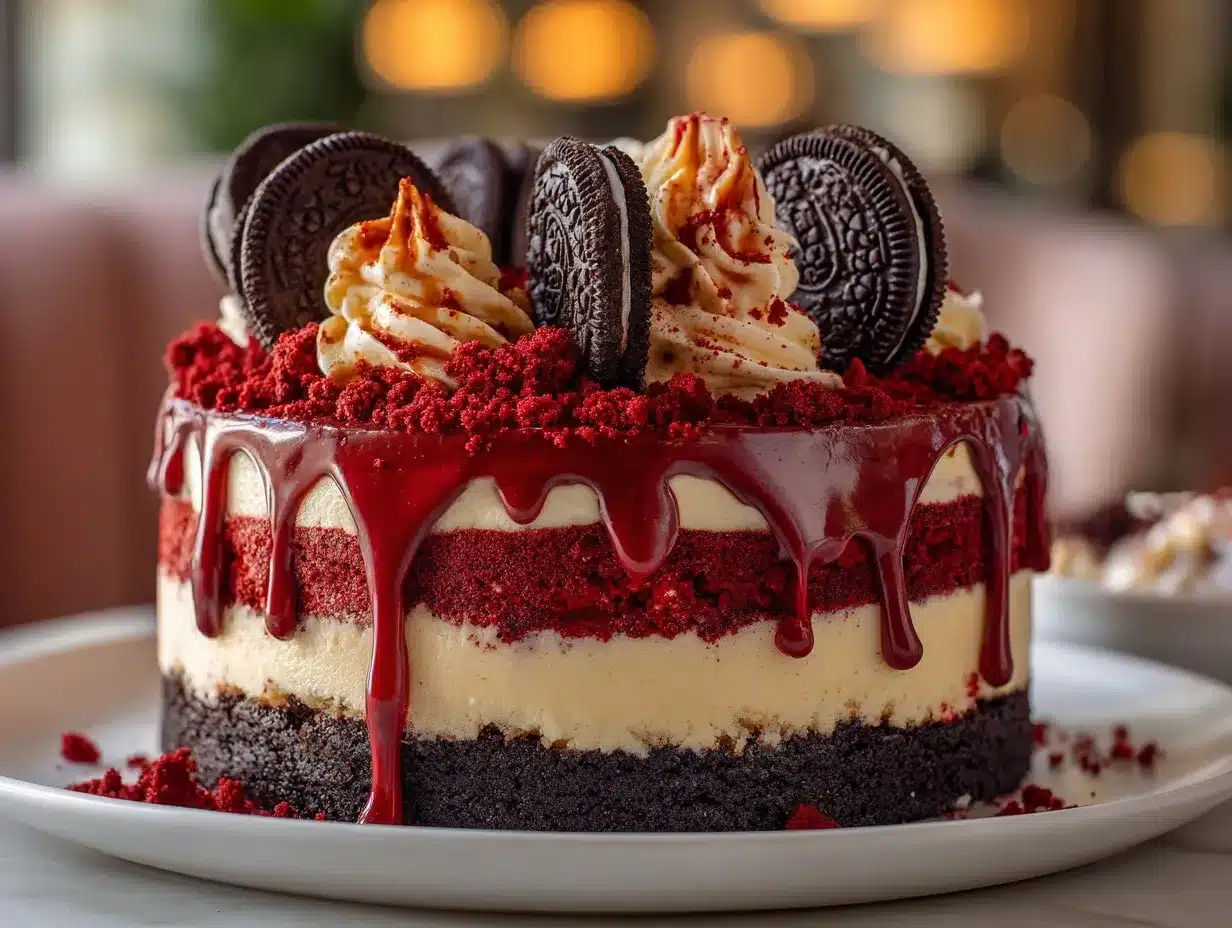
The magic of an Oreo Red Velvet Cheesecake Drip Cake lies in its ability to dazzle both taste buds and eyes. Imagine slicing into a velvety red cake layered with creamy cheesecake, studded with Oreo crumbles, and finished with a glossy chocolate drip that cascades down the sides like liquid gold. It’s the kind of dessert that stops conversations and has everyone reaching for their cameras before their forks!
I first made this show-stopping creation for my best friend’s birthday, and let me tell you, it was a hit. The combination of nostalgic Oreo crunch and the decadent richness of red velvet paired with cheesecake is pure bliss. Plus, the dramatic drip effect gives it that bakery-quality look without requiring a pastry chef’s experience.
This recipe is perfect for special occasions, from birthdays to anniversaries, or even just because you feel like indulging your sweet tooth. Trust me, once you try it, you’ll be hooked. Let’s dive into the details of how you can create your very own masterpiece with this Oreo Red Velvet Cheesecake Drip Cake.
Why You’ll Love This Recipe
- Triple Treat: Combines three favorite desserts—red velvet cake, cheesecake, and Oreos—for an unforgettable experience.
- Visually Stunning: The chocolate drip and vibrant red velvet layers make this cake Instagram-worthy and perfect for parties.
- Surprisingly Easy: While it looks fancy, the steps are straightforward, and you don’t need specialized skills to nail it.
- Customizable: Add your creative touch with different Oreo flavors or festive sprinkles.
- Crowd-Pleaser: Everyone loves Oreos, and when paired with the tangy cream cheese and soft red velvet, this cake is always a hit.
One of the things that makes this recipe stand out is its layers. The combination of fluffy cake and creamy cheesecake keeps each bite exciting and balanced. Plus, the Oreo crust adds a delightful crunch that’s hard to resist. Whether you’re hosting a party or just want to impress your family, this cake hits all the right notes.
What Ingredients You Will Need
This recipe uses simple yet indulgent ingredients to create the ultimate dessert experience. Here’s what you’ll need:
For the Oreo Crust:
- 2 cups Oreo crumbs (about 20 Oreos)
- 1/4 cup unsalted butter, melted
For the Cheesecake Layer:
- 16 oz cream cheese, softened
- 3/4 cup granulated sugar
- 2 large eggs, room temperature
- 1/3 cup sour cream
- 1 tsp vanilla extract
For the Red Velvet Cake:
- 2 1/2 cups all-purpose flour
- 2 tbsp unsweetened cocoa powder
- 1 tsp baking powder
- 1/4 tsp salt
- 1/2 cup unsalted butter, softened
- 1 3/4 cups granulated sugar
- 2 large eggs
- 1 cup buttermilk
- 2 tbsp red food coloring
- 1 tsp vanilla extract
- 1 tsp white vinegar
- 1 tsp baking soda
For the Chocolate Drip:
- 1 cup semi-sweet chocolate chips
- 1/2 cup heavy cream
Optional for Decoration:
- Crushed Oreos for garnish
- Whipped cream or frosting for piping
- Sprinkles or edible glitter for extra sparkle
Equipment Needed
- Springform pan: Essential for the cheesecake layer and Oreo crust. A 9-inch pan works perfectly.
- Mixing bowls: You’ll need several for the cake batter, cheesecake mixture, and the Oreo crust.
- Electric mixer: A hand mixer or stand mixer will make blending ingredients a breeze.
- Spatula: For spreading layers evenly.
- Double boiler: Helpful for melting chocolate for the drip, though a microwave works too.
- Offset spatula: Optional but great for frosting smoothly.
If you don’t have a springform pan, you can use a regular round cake pan lined with parchment paper for easier removal.
Preparation Method
- Prepare the Oreo crust: Crush Oreos into fine crumbs using a food processor or by placing them in a zip-top bag and rolling with a rolling pin. Mix the crumbs with melted butter until well combined, then press firmly into the bottom of a 9-inch springform pan. Chill in the fridge while you prepare the cheesecake layer.
- Make the cheesecake layer: Preheat your oven to 325°F (165°C). Beat the softened cream cheese and sugar together until smooth. Add eggs one at a time, beating well after each addition. Stir in sour cream and vanilla extract until combined. Pour the mixture over the chilled Oreo crust and smooth it out using a spatula. Bake for 40 minutes, or until the edges are set but the center is slightly jiggly. Let cool completely.
- Prepare the red velvet cake: Increase oven temperature to 350°F (175°C). In a bowl, whisk together flour, cocoa powder, baking powder, and salt. In a separate bowl, beat the softened butter and sugar until light and fluffy. Add eggs one at a time, then mix in buttermilk, red food coloring, vanilla extract, and vinegar. Gradually fold in the dry ingredients until just combined. Divide the batter evenly between two greased and floured 9-inch round cake pans. Bake for 25-30 minutes or until a toothpick inserted into the center comes out clean. Cool completely.
- Assemble the cake: Place one red velvet cake layer on a cake stand or plate. Spread a thin layer of frosting or whipped cream, then carefully place the cheesecake layer on top. Add another thin layer of frosting and top with the second red velvet cake layer.
- Prepare the chocolate drip: In a small saucepan or double boiler, heat the heavy cream until steaming but not boiling. Remove from heat and stir in chocolate chips until melted and smooth. Let cool slightly before drizzling over the cake using a spoon or piping bag.
- Decorate: Garnish with crushed Oreos, piped whipped cream, and sprinkles for a festive finish. Chill the cake for at least an hour before serving to let the flavors meld together.
Cooking Tips & Techniques
- Room temperature ingredients: Make sure your cream cheese, eggs, and butter are at room temperature for a smoother, lump-free batter.
- Don’t skip the chilling steps: Allowing the layers to properly cool ensures a stable and clean assembly.
- Perfect drips: Test the consistency of your chocolate drip on the back of a spoon first. If it runs too fast, let it cool a bit longer.
- Level your cake: Trim the tops of your red velvet cake layers if they’re uneven for a professional look.
- Use parchment paper: Line your pans to avoid sticking and make cleanup easier.
Remember, patience is key when assembling layered cakes. Don’t rush the cooling process—it’s worth the wait!
Variations & Adaptations
- Dietary swaps: Use gluten-free flour and gluten-free Oreos for a celiac-friendly version. Swap cream cheese with dairy-free alternatives for lactose sensitivity.
- Seasonal twist: Add crushed peppermint candies to the Oreo crust during the holidays or fresh berries between the layers for a summer treat.
- Flavor customization: Try golden Oreos for a vanilla twist or use dark chocolate chips for a more intense drip flavor.
One fun variation I’ve tried is swapping the red velvet cake with a chocolate cake and adding a peanut butter-flavored cheesecake layer. Trust me, it’s heavenly!
Serving & Storage Suggestions
For the ultimate experience, serve this Oreo Red Velvet Cheesecake Drip Cake chilled or at room temperature. Its creamy, indulgent texture shines best when slightly cool. Pair it with a hot cup of coffee, a glass of cold milk, or even a scoop of vanilla ice cream for an over-the-top treat.
Store leftover cake in the refrigerator for up to 5 days, tightly covered to keep the layers moist. For long-term storage, wrap individual slices in plastic wrap and freeze for up to 2 months. To reheat, thaw in the fridge overnight and enjoy as is—no need for additional warming.
Nutritional Information & Benefits
While this cake is definitely an indulgence, it features wholesome ingredients like cream cheese and buttermilk, which provide calcium and protein. Here’s a rough estimate per slice (based on 12 servings):
- Calories: 550
- Protein: 6g
- Fat: 25g
- Carbohydrates: 70g
Keep in mind, the Oreo Red Velvet Cheesecake Drip Cake is meant to be enjoyed in moderation as a special treat!
Conclusion
The Oreo Red Velvet Cheesecake Drip Cake isn’t just a dessert—it’s an experience. From its stunning presentation to its rich and creamy flavor, it’s the kind of cake that leaves a lasting impression. Whether you’re celebrating a milestone or simply indulging your sweet tooth, this recipe will quickly become a favorite.
Have fun customizing the layers and decorations to make it your own. I’d love to hear how your cake turns out—feel free to share your variations and tips in the comments below. And if this recipe brings a little extra joy to your day, don’t forget to share it with your friends and family!
Happy baking!
FAQs
Can I make this cake ahead of time?
Yes! You can prepare the cheesecake layer and red velvet cakes a day in advance. Assemble and decorate the cake closer to serving time for the best presentation.
Can I use a boxed red velvet cake mix?
Absolutely! If you’re short on time, a boxed mix works just fine. Just follow the package instructions and focus on the cheesecake and Oreo crust layers.
How do I prevent my cheesecake from cracking?
Avoid overmixing the batter, and bake the cheesecake in a water bath for even cooking. Let it cool gradually to prevent sudden temperature changes.
What’s the best way to drizzle the chocolate drip?
Use a spoon or piping bag to control the drip. Test the chocolate consistency first—it should be pourable but not runny.
Can I use a different type of cookie for the crust?
Yes! Graham crackers, chocolate chip cookies, or even shortbread make great alternatives depending on your flavor preferences.
Pin This Recipe!

Oreo Red Velvet Cheesecake Drip Cake
A stunning layered cake combining red velvet, creamy cheesecake, and Oreo crunch, topped with a glossy chocolate drip for a show-stopping dessert.
- Prep Time: 45 minutes
- Cook Time: 1 hour 10 minutes
- Total Time: 1 hour 55 minutes
- Yield: 12 servings 1x
- Category: Dessert
- Cuisine: American
Ingredients
- 2 cups Oreo crumbs (about 20 Oreos)
- 1/4 cup unsalted butter, melted
- 16 oz cream cheese, softened
- 3/4 cup granulated sugar
- 2 large eggs, room temperature
- 1/3 cup sour cream
- 1 tsp vanilla extract
- 2 1/2 cups all-purpose flour
- 2 tbsp unsweetened cocoa powder
- 1 tsp baking powder
- 1/4 tsp salt
- 1/2 cup unsalted butter, softened
- 1 3/4 cups granulated sugar
- 2 large eggs
- 1 cup buttermilk
- 2 tbsp red food coloring
- 1 tsp vanilla extract
- 1 tsp white vinegar
- 1 tsp baking soda
- 1 cup semi-sweet chocolate chips
- 1/2 cup heavy cream
- Crushed Oreos for garnish
- Whipped cream or frosting for piping
- Sprinkles or edible glitter for extra sparkle
Instructions
- Prepare the Oreo crust: Crush Oreos into fine crumbs using a food processor or by placing them in a zip-top bag and rolling with a rolling pin. Mix the crumbs with melted butter until well combined, then press firmly into the bottom of a 9-inch springform pan. Chill in the fridge while you prepare the cheesecake layer.
- Make the cheesecake layer: Preheat your oven to 325°F (165°C). Beat the softened cream cheese and sugar together until smooth. Add eggs one at a time, beating well after each addition. Stir in sour cream and vanilla extract until combined. Pour the mixture over the chilled Oreo crust and smooth it out using a spatula. Bake for 40 minutes, or until the edges are set but the center is slightly jiggly. Let cool completely.
- Prepare the red velvet cake: Increase oven temperature to 350°F (175°C). In a bowl, whisk together flour, cocoa powder, baking powder, and salt. In a separate bowl, beat the softened butter and sugar until light and fluffy. Add eggs one at a time, then mix in buttermilk, red food coloring, vanilla extract, and vinegar. Gradually fold in the dry ingredients until just combined. Divide the batter evenly between two greased and floured 9-inch round cake pans. Bake for 25-30 minutes or until a tooth…
- Assemble the cake: Place one red velvet cake layer on a cake stand or plate. Spread a thin layer of frosting or whipped cream, then carefully place the cheesecake layer on top. Add another thin layer of frosting and top with the second red velvet cake layer.
- Prepare the chocolate drip: In a small saucepan or double boiler, heat the heavy cream until steaming but not boiling. Remove from heat and stir in chocolate chips until melted and smooth. Let cool slightly before drizzling over the cake using a spoon or piping bag.
- Decorate: Garnish with crushed Oreos, piped whipped cream, and sprinkles for a festive finish. Chill the cake for at least an hour before serving to let the flavors meld together.
Notes
[‘Ensure all ingredients are at room temperature for smoother mixing.’, ‘Allow layers to cool completely before assembling to prevent instability.’, ‘Test chocolate drip consistency before applying to the cake.’]
Nutrition
- Serving Size: 1 slice
- Calories: 550
- Fat: 25
- Carbohydrates: 70
- Protein: 6
Keywords: Oreo, Red Velvet, Cheesecake, Drip Cake, Layered Cake, Birthday Cake, Special Occasion Dessert



