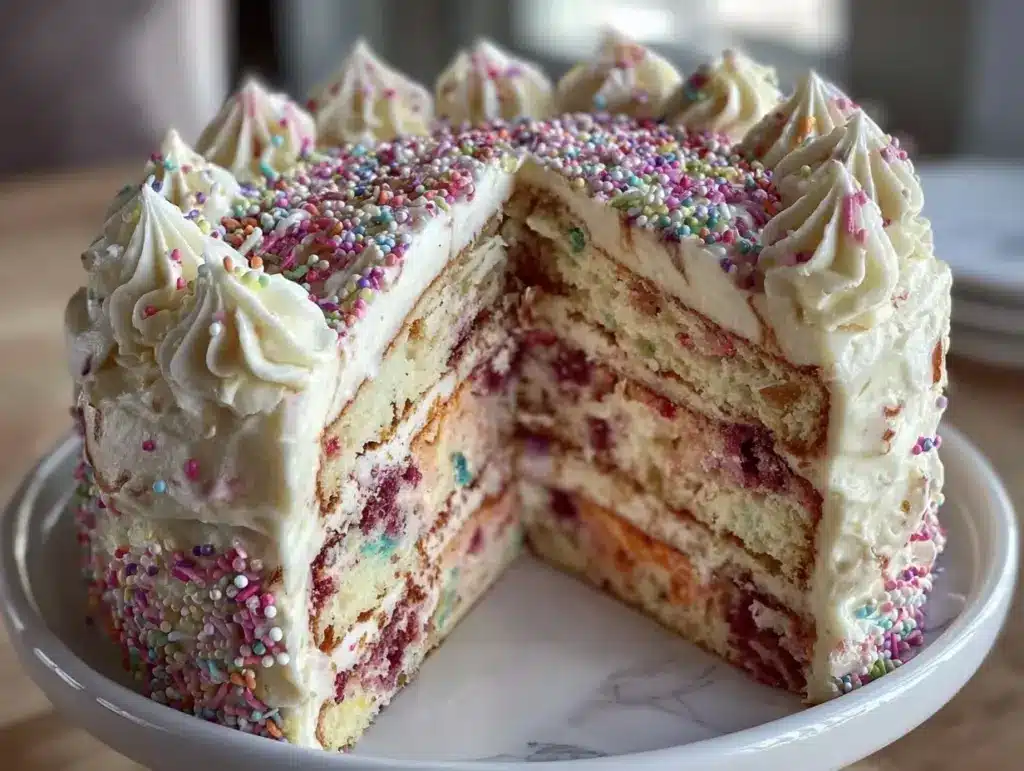
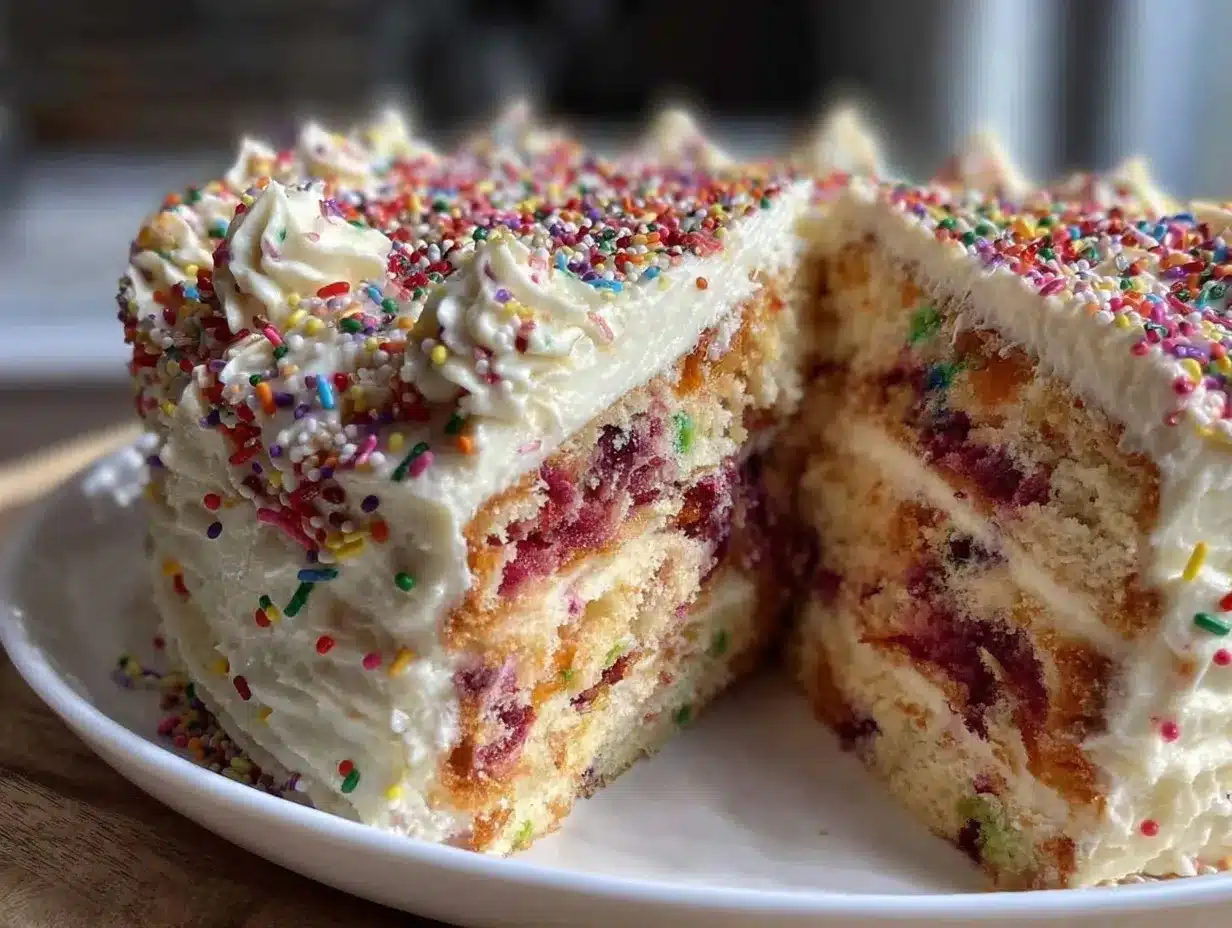
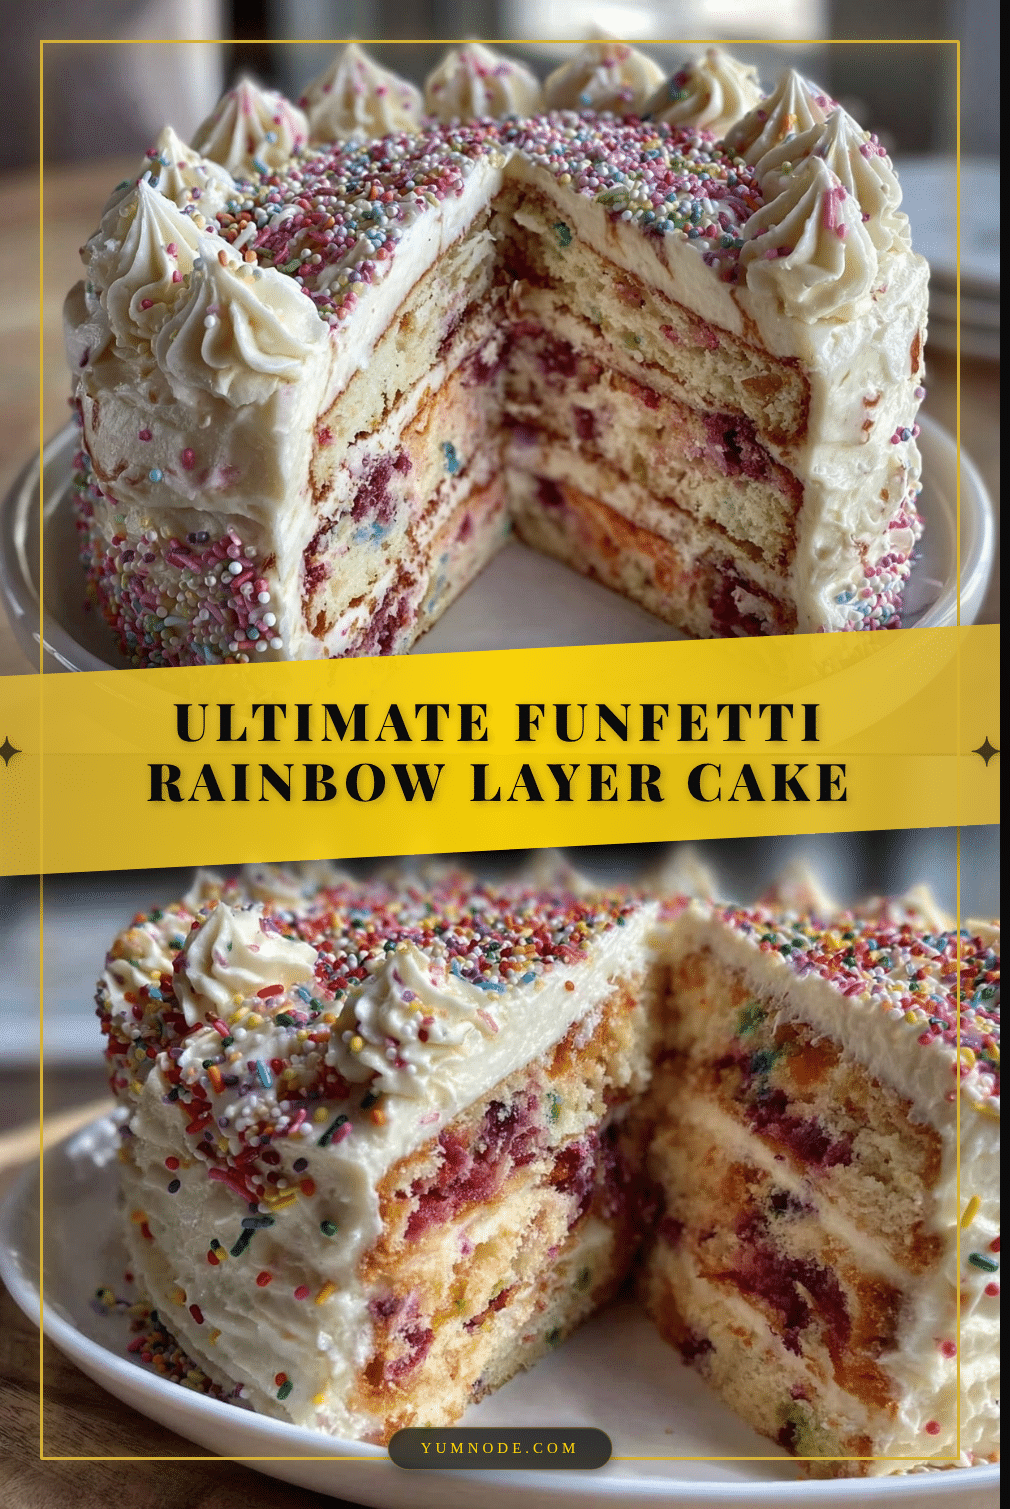
Let me tell you, the moment I sliced into this perfect funfetti cake and saw those vibrant rainbow layers peeking back at me was pure magic. The scent of vanilla and sugar danced through the kitchen, instantly making my mouth water. I remember the first time I baked this funfetti cake—it was a rainy Saturday afternoon, and I wanted something cheerful that would brighten up the gloomy weather. As I pulled it out of the oven, the kind of moment where you pause, take a deep breath, and just smile because you know you’re onto something truly special, washed over me.
This recipe has been a nostalgic trip back to when I was knee-high to a grasshopper, celebrating birthdays with sprinkles and smiles. Years ago, I stumbled upon a classic funfetti recipe but felt it lacked that wow factor, so I started experimenting with rainbow layers and a few secret tweaks. Honestly, I wish I’d discovered this version way sooner—it’s dangerously easy and packed with pure, nostalgic comfort.
My family couldn’t stop sneaking slices off the cooling rack (and I can’t really blame them). This cake quickly became a staple for family gatherings and gifting, bringing smiles all around. Whether you’re looking to brighten up your Pinterest cookie board or need the perfect colorful dessert for a birthday bash, this vibrant rainbow layer funfetti cake has got you covered. You’re going to want to bookmark this one, trust me.
Why You’ll Love This Recipe
After testing this perfect funfetti cake recipe multiple times (in the name of research, of course), I can confidently say it’s a winner for so many reasons. Here’s why you’re going to fall head over heels for it:
- Quick & Easy: Comes together in under 45 minutes, perfect for busy weeknights or last-minute celebrations.
- Simple Ingredients: No need for fancy or hard-to-find items; most are pantry staples you probably already have.
- Perfect for Any Occasion: Ideal for birthdays, baby showers, or just a cheerful weekend treat.
- Crowd-Pleaser: Kids and adults alike rave about the moist layers and fun bursts of color from the sprinkles.
- Unbelievably Delicious: The texture is soft and tender, with a perfect balance of vanilla sweetness and colorful fun.
What sets this funfetti cake apart is the vibrant rainbow layers that pop with every slice—no dull moments here. The trick is in dividing the batter evenly and adding just the right amount of gel food coloring for those bright, happy hues.
This isn’t just another funfetti cake; it’s the version that makes you close your eyes after the first bite, savoring the simple joy of celebration in every forkful. It’s the kind of dessert that feels like a warm hug from your childhood but with a fresh, modern twist. Plus, it’s stress-free enough to impress guests without breaking a sweat.
What Ingredients You Will Need
This perfect funfetti cake uses simple, wholesome ingredients to deliver bold flavor and vibrant color without fuss. Most of these are pantry staples, and the sprinkles add that signature funfetti flair.
- For the Cake Batter:
- 2 ½ cups (312g) all-purpose flour (for best texture, I like King Arthur’s brand)
- 2 ½ tsp baking powder
- ½ tsp salt
- 1 cup (226g) unsalted butter, softened (adds richness and moistness)
- 1 ¾ cups (350g) granulated sugar
- 4 large eggs, room temperature
- 1 tbsp pure vanilla extract
- 1 cup (240ml) whole milk, room temperature (use dairy-free milk if needed)
- ½ cup rainbow sprinkles (look for non-melting, high-quality ones to avoid color bleed)
- Gel food coloring in red, orange, yellow, green, blue, and purple (gel colors give vibrant hues without thinning batter)
- For the Frosting:
- 1 cup (226g) unsalted butter, softened
- 4 cups (480g) powdered sugar, sifted
- 2 tsp vanilla extract
- 2-4 tbsp heavy cream or milk (adjust for desired consistency)
- Pinch of salt
If you want a gluten-free option, swapping the flour for a 1:1 gluten-free baking flour blend works well. For a dairy-free cake, substitute the butter and milk with plant-based alternatives—I’ve tried coconut oil and almond milk, and both are tasty.
Equipment Needed
- Six 6-inch round cake pans (or three 8-inch pans if you want thicker layers; just split the batter accordingly)
- Electric mixer (stand mixer or hand mixer) for smooth batter and frosting
- Mixing bowls (multiple, for dividing batter and colors)
- Measuring cups and spoons (for precision)
- Rubber spatula (for folding sprinkles and scraping bowls)
- Cooling racks (to cool cakes evenly)
- Offset spatula (for smooth frosting application)
- Kitchen scale (optional but recommended for even batter division)
If you don’t have six pans, you can bake in batches—just keep the unused batter covered. Budget-wise, I once used parchment paper circles in 8-inch pans to prevent sticking, which worked great. Maintenance-wise, non-stick pans make cleanup easier, but a good greasing and flouring works just as well.
Preparation Method
- Preheat your oven to 350°F (175°C). Grease and flour your cake pans or line them with parchment paper circles to prevent sticking. This step is key to getting clean edges.
- Mix dry ingredients: In a medium bowl, whisk together 2 ½ cups flour, baking powder, and salt. Set aside.
- Cream butter and sugar: Using your mixer, beat the softened butter and sugar together on medium speed for about 4-5 minutes until fluffy and pale. This aeration helps the cake rise beautifully.
- Add eggs and vanilla: Beat in the eggs one at a time, making sure each is fully incorporated before adding the next. Stir in the vanilla extract. The batter should be smooth and glossy.
- Alternate adding dry ingredients and milk: With the mixer on low, add the flour mixture in three parts, alternating with the milk (start and end with flour). Mix just until combined after each addition to avoid overmixing (which can make the cake dense).
- Fold in sprinkles: Gently fold in ½ cup rainbow sprinkles with a spatula. Be careful not to overmix; you want those sprinkles to stay intact and colorful.
- Divide the batter evenly: Using a kitchen scale or measuring cups, divide the batter into six equal portions in separate bowls.
- Add gel food coloring: Add a few drops of gel food coloring to each bowl to create red, orange, yellow, green, blue, and purple batters. Stir gently until evenly colored.
- Pour batter into pans: Pour each colored batter into its prepared pan, smoothing the tops with a spatula for even layers.
- Bake: Bake in the preheated oven for 18-22 minutes, or until a toothpick inserted comes out clean. Times may vary slightly depending on your oven.
- Cool: Let cakes cool in pans for 10 minutes, then remove to cooling racks to cool completely. Patience here is a virtue—you don’t want frosting melting!
- Make the frosting: Beat softened butter on medium speed until creamy. Gradually add powdered sugar, then vanilla, salt, and cream. Beat until light and fluffy, adding more cream as needed for spreadable consistency.
- Assemble the cake: Place the purple layer on your cake stand or plate. Spread a thin layer of frosting on top, then stack the blue layer. Repeat layering with green, yellow, orange, and red, frosting between each.
- Frost the outside: Apply a crumb coat (thin layer of frosting) and chill for 15 minutes. Then add a final thick coat, smoothing with an offset spatula for a clean finish.
Pro tip: If your batter looks too thick after adding coloring, a splash of milk can help. And if sprinkles start bleeding color, toss them in flour before folding in next time. These little tweaks make a big difference.
Cooking Tips & Techniques
Honestly, the trickiest part is getting those vibrant layers just right without color bleeding or uneven baking. Here are some tips and lessons learned:
- Use gel food coloring: It’s more concentrated and won’t thin the batter like liquid colorings do, which keeps those layers thick and moist.
- Don’t overmix: When combining wet and dry ingredients, mix just until combined. Overmixing develops gluten and can make your cake tough instead of tender.
- Measure carefully: Dividing the batter evenly is key for uniform layers. A kitchen scale is a friend here to avoid lopsided cakes.
- Watch the oven: Oven temperatures vary, so start checking at 18 minutes. Insert a toothpick in the center; if it comes out clean, it’s done.
- Prep sprinkles properly: Tossing sprinkles in a little flour before folding them into the batter helps prevent them from sinking to the bottom or bleeding color.
- Chill between frosting steps: Applying a crumb coat and letting it chill helps trap crumbs and makes the final frosting smooth and clean.
- Multitasking tip: While layers bake, prep frosting and clean up. It saves time and keeps your workspace manageable.
Trust me, after a few tries, assembling this funfetti cake becomes a breeze, and the payoff is totally worth it.
Variations & Adaptations
This perfect funfetti cake is as flexible as a dance move, ready to match your mood or dietary needs. Here are a few ways I’ve switched it up:
- Dietary swap: Use almond or coconut flour for a gluten-free twist. Just note the texture will be slightly different but still delicious.
- Seasonal flavors: In spring, I swap vanilla for lemon zest and juice for a fresh citrus kick, adding yellow and green layers for a sunny vibe.
- Chocolate funfetti: Replace ½ cup flour with cocoa powder for a subtle chocolate base. Then add colorful sprinkles on top for contrast.
- Alternative frosting: Cream cheese frosting adds tangy richness if you want a change from classic buttercream.
- Sprinkle-free option: For a more sophisticated look, leave sprinkles out and decorate with edible flowers or fruit slices between layers.
Personally, I once tried a dairy-free coconut whipped cream frosting on this cake, and it was a tropical delight that disappeared fast. Feel free to experiment; this recipe welcomes your creative spin.
Serving & Storage Suggestions
This vibrant funfetti cake is best served at room temperature to let flavors shine and frosting soften just right. Slice with a sharp serrated knife for clean edges.
Pair it with a simple glass of cold milk or a cup of tea to balance all that sweetness. For a party, it pairs beautifully with fresh berries or a light fruit salad to cut through the richness.
Store leftovers covered tightly at room temperature for up to 2 days or in the refrigerator for up to 5 days. If refrigerated, bring to room temperature before serving for the best texture.
Want to freeze? Wrap individual layers tightly in plastic wrap and foil, then freeze for up to 3 months. Thaw layers overnight in the fridge before assembling.
Fun fact: the flavors and moisture develop wonderfully overnight, so this cake tastes even better the next day—if you can wait that long!
Nutritional Information & Benefits
Each slice of this perfect funfetti cake (assuming 12 servings) contains approximately 350-400 calories, with about 18g fat, 50g carbohydrates, and 4g protein. While it’s a treat, it’s made with real butter and eggs, providing some nutritional value beyond just sugar.
The whole milk and butter add vitamins A and D, while eggs contribute protein and essential amino acids. Using quality ingredients like pure vanilla extract and real sprinkles means you’re avoiding unnecessary additives.
For those watching gluten or dairy intake, this recipe adapts nicely with gluten-free flour blends and dairy-free substitutes, making it friendly for various dietary needs.
Conclusion
If you’re after a cake that’s as joyful to look at as it is to eat, this perfect funfetti cake with vibrant rainbow layers is your answer. It’s simple enough for weeknight baking but special enough for celebrations. Customize it however you like—add your favorite colors, swap frostings, or tweak flavors to make it your own.
Personally, this cake makes me feel like a kid again, with every bite sparking a little happiness and nostalgia. I hope you give it a try and fall in love just like my family and I have.
Don’t forget to share your baking adventures in the comments or tag me if you post on social media. I’d love to see your colorful creations and hear about your favorite funfetti twists. Happy baking!
FAQs
Can I use regular sprinkles instead of rainbow ones?
Yes! Just be aware that some sprinkles may bleed color into the batter. Tossing them in a little flour before folding in helps minimize this.
How do I prevent the colors from mixing or bleeding?
Using gel food coloring and gentle mixing helps keep colors vibrant. Also, bake each layer separately and cool completely before stacking.
Can I make this cake ahead of time?
Absolutely! Bake layers up to 2 days ahead and store wrapped in the fridge. Assemble and frost the day you plan to serve for the best results.
Is there a dairy-free version of this recipe?
Yes, swap butter for coconut oil or dairy-free margarine and use plant-based milk like almond or oat milk. The texture might vary slightly but remains delicious.
What’s the best way to slice the cake without messing up the layers?
Use a sharp serrated knife and wipe it clean between cuts. Chilling the cake for 20-30 minutes before slicing can also help keep layers neat.
Pin This Recipe!
Perfect Funfetti Cake Recipe Easy Vibrant Rainbow Layer Dessert

A vibrant rainbow layer funfetti cake that’s quick, easy, and perfect for celebrations. Moist, tender, and bursting with colorful sprinkles, this nostalgic dessert is sure to delight both kids and adults.
- Prep Time: 20 minutes
- Cook Time: 22 minutes
- Total Time: 42 minutes
- Yield: 12 servings 1x
- Category: Dessert
- Cuisine: American
Ingredients
- 2 ½ cups (312g) all-purpose flour
- 2 ½ tsp baking powder
- ½ tsp salt
- 1 cup (226g) unsalted butter, softened
- 1 ¾ cups (350g) granulated sugar
- 4 large eggs, room temperature
- 1 tbsp pure vanilla extract
- 1 cup (240ml) whole milk, room temperature
- ½ cup rainbow sprinkles (non-melting, high-quality)
- Gel food coloring in red, orange, yellow, green, blue, and purple
- For the Frosting:
- 1 cup (226g) unsalted butter, softened
- 4 cups (480g) powdered sugar, sifted
- 2 tsp vanilla extract
- 2–4 tbsp heavy cream or milk
- Pinch of salt
Instructions
- Preheat your oven to 350°F (175°C). Grease and flour your cake pans or line them with parchment paper circles to prevent sticking.
- In a medium bowl, whisk together 2 ½ cups flour, baking powder, and salt. Set aside.
- Using your mixer, beat the softened butter and sugar together on medium speed for about 4-5 minutes until fluffy and pale.
- Beat in the eggs one at a time, making sure each is fully incorporated before adding the next. Stir in the vanilla extract.
- With the mixer on low, add the flour mixture in three parts, alternating with the milk (start and end with flour). Mix just until combined after each addition.
- Gently fold in ½ cup rainbow sprinkles with a spatula, being careful not to overmix.
- Divide the batter evenly into six portions in separate bowls.
- Add a few drops of gel food coloring to each bowl to create red, orange, yellow, green, blue, and purple batters. Stir gently until evenly colored.
- Pour each colored batter into its prepared pan, smoothing the tops with a spatula.
- Bake for 18-22 minutes, or until a toothpick inserted comes out clean.
- Let cakes cool in pans for 10 minutes, then remove to cooling racks to cool completely.
- For the frosting, beat softened butter on medium speed until creamy. Gradually add powdered sugar, then vanilla, salt, and cream. Beat until light and fluffy, adjusting cream for desired consistency.
- Assemble the cake by placing the purple layer on a cake stand or plate. Spread a thin layer of frosting on top, then stack the blue layer. Repeat layering with green, yellow, orange, and red, frosting between each.
- Apply a crumb coat and chill for 15 minutes. Then add a final thick coat, smoothing with an offset spatula.
Notes
Use gel food coloring to avoid thinning the batter and to keep colors vibrant. Toss sprinkles in a little flour before folding in to prevent color bleeding. Divide batter evenly using a kitchen scale for uniform layers. Chill cake between frosting steps for a smooth finish. If batter is too thick after coloring, add a splash of milk.
Nutrition
- Serving Size: 1 slice (1/12 of cak
- Calories: 375
- Sugar: 35
- Sodium: 220
- Fat: 18
- Saturated Fat: 11
- Carbohydrates: 50
- Fiber: 1
- Protein: 4
Keywords: funfetti cake, rainbow cake, layer cake, birthday cake, easy cake recipe, colorful cake, sprinkles cake, vanilla cake