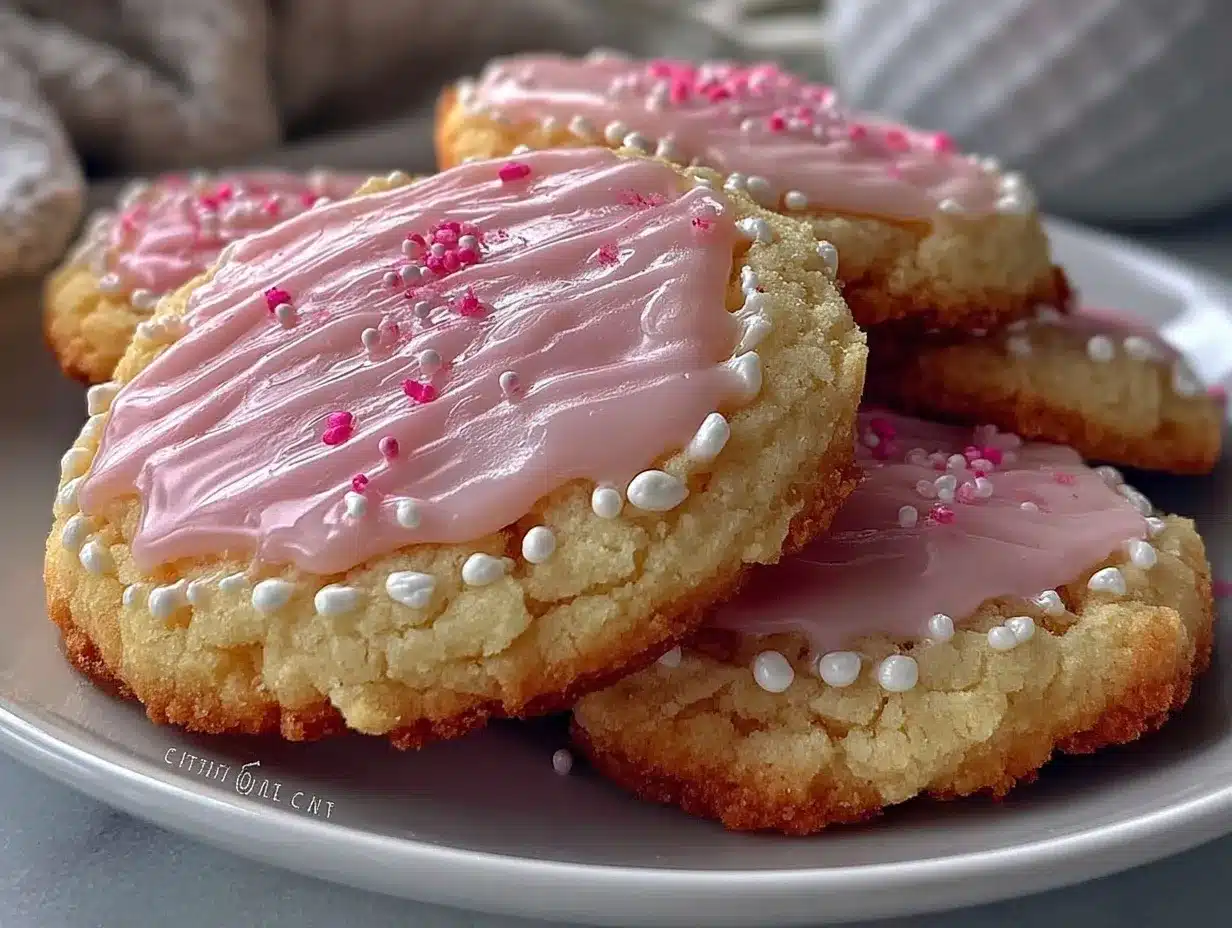
It wasn’t supposed to be pink. Honestly, I was just aiming for a classic sugar cookie, nothing fancy. But then my niece came over with this tiny bottle of bright pink food coloring she wouldn’t stop waving around, insisting I “make it pretty.” I rolled my eyes but gave in, thinking, “Why not?” The next thing I knew, these Perfect Pink Velvet Sugar Cookies with Royal Icing were born—unexpectedly delightful and way too fun to stop making. The kitchen smelled like vanilla and sugar, with just a hint of that gorgeous rosy hue, and I caught myself sneaking bites before the icing was even on.
I’ve since made these cookies a handful of times—each batch a little experiment with color intensity and icing designs (that royal icing tutorial is a lifesaver, by the way). What started as a playful whim turned into a favorite treat for birthdays, baby showers, and those random afternoons when you need a little sweetness in your life. The texture? Soft, tender, with just enough chew to feel like a hug in cookie form. And that royal icing? It dries smooth and crisp, perfect for decorating or gifting without a crumbly mess. It’s funny how a simple splash of pink changed everything—and honestly, these cookies have stuck with me because they’re as joyful to make as they are to eat.
So here’s the story behind these pink velvet sugar cookies: a little surprise, a sprinkle of patience, and a whole lot of sweetness. If you’ve ever been skeptical about adding food coloring or royal icing to your baking, I get it. But trust me, this recipe earns its spot in your baking rotation—no frills, just pure, pretty, and perfectly pink goodness.
Why You’ll Love This Recipe
- Quick & Easy: These cookies come together in about 30 minutes of prep, making them ideal for busy weeknights or last-minute celebrations.
- Simple Ingredients: No need to hunt for anything exotic—most are pantry staples like flour, sugar, and butter.
- Perfect for Special Occasions: Pink velvet sugar cookies are a hit at baby showers, Valentine’s Day, bridal parties, or just because you want to brighten someone’s day.
- Crowd-Pleaser: Kids and adults alike love these—soft, flavorful, and not too sweet.
- Unbelievably Delicious: The velvety texture combined with vanilla and a hint of almond extract makes each bite melt-in-your-mouth satisfying.
- This isn’t just another sugar cookie recipe—adding beet juice powder (or red food coloring if you prefer) gives these cookies a subtle natural pink tint that feels fresh and fun without overpowering the flavor.
- The royal icing tutorial included ensures you get that smooth, glossy finish that’s stable and perfect for detailed decorating without cracking or bleeding.
- This recipe has become my go-to when I want a cookie that feels special without fuss. It’s the kind of treat you remember—simple, sweet, and with a little personality.
What Ingredients You Will Need
This recipe uses simple, wholesome ingredients to deliver bold flavor and a satisfying velvety texture without fuss. Most of these are pantry staples, and you can easily swap a few for dietary needs or preferences.
- All-purpose flour (2 ½ cups / 310 grams) – The base for a tender cookie, sifted for lightness.
- Baking powder (1 teaspoon) – Helps the cookies rise just enough for softness.
- Salt (½ teaspoon) – Balances sweetness and enhances flavor.
- Unsalted butter (1 cup / 227 grams, softened) – Use quality butter like Kerrygold for richness.
- Granulated sugar (1 ¼ cups / 250 grams) – Sweetens and helps with texture.
- Large eggs (2, room temperature) – Binds ingredients and adds moisture.
- Vanilla extract (1 ½ teaspoons) – Adds warm, classic flavor.
- Almond extract (½ teaspoon, optional) – Gives a subtle nutty note that pairs beautifully with the vanilla.
- Pink food coloring or beet juice powder (1-2 teaspoons) – For that signature pink velvet shade; beet powder offers a natural alternative.
For the Royal Icing:
- Powdered sugar (4 cups / 480 grams), sifted – For a smooth, glossy finish.
- Egg whites (3 large) or pasteurized meringue powder (3 tablespoons) mixed with water – Acts as the binder.
- Lemon juice (1 tablespoon) or vanilla extract – Adds subtle flavor and helps the icing set.
- Pink food coloring (optional) – To match or complement the cookie color.
If you want a dairy-free or vegan version, swap butter for a plant-based alternative and use aquafaba (chickpea water) instead of egg whites for the royal icing. For gluten-free, almond or oat flour blends work well but adjust baking times slightly.
Equipment Needed
- Mixing bowls: A large bowl for the dough and a smaller one for the royal icing.
- Electric mixer: Stand or hand mixer to cream butter and sugar smoothly.
- Measuring cups and spoons: Accuracy is key here for perfect texture.
- Sifter: Helps avoid lumps in flour and powdered sugar.
- Rolling pin: For even dough thickness; silicone rolling pins are great for less sticking.
- Cookie cutters: Choose your favorite shapes—rounds or hearts work beautifully for this recipe.
- Baking sheets: Non-stick or lined with parchment paper for easy cleanup.
- Cooling rack: To let cookies cool completely before icing.
- Piping bags and tips: For detailed royal icing designs; if you don’t have fancy tips, a plastic sandwich bag with a small corner snipped works fine.
Personally, I find silicone baking mats worth the investment—they prevent sticking and help cookies bake evenly. Also, keep your electric mixer’s beaters clean and dry before whipping egg whites for royal icing—any grease can prevent peaks from forming.
Preparation Method
- Mix dry ingredients: In a medium bowl, sift together 2 ½ cups (310 g) all-purpose flour, 1 teaspoon baking powder, and ½ teaspoon salt. Set aside. This ensures a light, even texture.
- Cream butter and sugar: Using an electric mixer, beat 1 cup (227 g) softened unsalted butter with 1 ¼ cups (250 g) granulated sugar until light and fluffy, about 3-4 minutes. You’ll notice the mixture turning pale and smooth—a sign it’s ready.
- Add eggs and extracts: Beat in 2 large eggs, one at a time, then stir in 1 ½ teaspoons vanilla extract and ½ teaspoon almond extract (if using). The batter will look creamy and slightly thick.
- Incorporate the pink color: Add 1-2 teaspoons of pink food coloring or beet juice powder and mix until the color is evenly distributed. Adjust amount based on your preferred shade, but remember, a little goes a long way.
- Combine wet and dry: Gradually add the flour mixture to the wet ingredients, mixing on low speed just until combined. Avoid overmixing to keep cookies tender.
- Chill the dough: Wrap the dough in plastic wrap and refrigerate for at least 1 hour. This step prevents spreading and helps the cookies hold their shape when baked.
- Preheat oven & prep pans: Heat your oven to 350°F (175°C). Line baking sheets with parchment paper or silicone mats.
- Roll out dough: On a lightly floured surface, roll dough to about ¼ inch (6 mm) thickness. Use cookie cutters to cut shapes, transferring them carefully to the baking sheets.
- Bake: Bake for 10-12 minutes, until edges just start to turn golden but centers remain soft. Keep a close eye—overbaking dries them out.
- Cool completely: Transfer cookies to a wire rack and let cool fully before icing. Patience here pays off; warm cookies can melt the royal icing.
- Prepare royal icing: Beat 3 large egg whites (or 3 tablespoons meringue powder mixed with water) with 4 cups (480 g) sifted powdered sugar and 1 tablespoon lemon juice until stiff peaks form and the icing is glossy.
- Color and decorate: Add a few drops of pink food coloring if desired, then pipe or spread icing onto cooled cookies. Let them dry at room temperature for several hours or overnight to set.
Pro tip: If your royal icing is too thick to pipe smoothly, add water a drop at a time until you get the right consistency. For flood consistency, it should flow slowly off a spoon, but still hold shape once spread.
Cooking Tips & Techniques
- Don’t skip chilling: Chilling the dough is crucial for keeping cookies from spreading too much in the oven. I’ve learned the hard way—warm dough leads to flat, sad cookies.
- Use room temperature eggs: They mix better and help the dough come together smoothly.
- Measure flour carefully: Too much flour can make cookies dry and crumbly. I spoon the flour into my measuring cup and level it off for accuracy.
- Watch your oven temperature: Ovens vary wildly. I recommend using an oven thermometer to avoid overbaking. The cookies should just start browning at the edges.
- For silky royal icing: Cleanliness is everything. Any grease or yolk in your egg whites can stop the icing from stiffening properly.
- Practice piping: If you’re new to royal icing, try on parchment paper first. It helps build confidence before decorating cookies.
- Let icing dry fully: It takes patience, but the crisp, smooth finish is worth it. Avoid stacking cookies until completely dry to prevent smudging.
Variations & Adaptations
- Flavor twists: Swap almond extract for lemon or orange zest for a citrusy note. Lavender or rosewater work beautifully, too—just a few drops will do.
- Color variations: Try pastel shades by reducing food coloring or experiment with ombré effects on your royal icing for a delicate look.
- Dietary swaps: Use gluten-free flour blends for gluten-free cookies. For vegan-friendly, replace butter with coconut oil and use aquafaba in place of egg whites in the icing.
- Textural changes: Add finely chopped freeze-dried raspberries or white chocolate chips for bursts of flavor and surprise.
- Alternative decorating methods: Skip the royal icing and dust cookies lightly with powdered sugar or dip one edge in melted chocolate for a simpler finish.
Personally, I once made a batch with half beet powder and half natural vanilla bean paste—resulting in a subtle marbled pink and flecks of vanilla that made the cookies look—and taste—extra special.
Serving & Storage Suggestions
These Perfect Pink Velvet Sugar Cookies are best served at room temperature. Let the icing fully harden to enjoy that lovely crisp snap on top with a soft, tender bite beneath. Pair them with a classic cup of tea or a cold glass of milk to balance the sweetness.
For gift-giving, stack cookies with parchment paper between layers inside an airtight container to keep them pristine. They keep well at room temperature for up to 3 days, or refrigerated for about a week. If you need to store longer, freeze un-iced cookies in a single layer, then thaw before decorating.
Reheating isn’t necessary, but if you want a warm cookie, gently microwave for 10 seconds (icing might soften a bit). The flavors actually deepen after a day or two, so if you can wait, you might find them even more delicious the next day!
Nutritional Information & Benefits
Each cookie (assuming 24 servings) contains approximately 150 calories, with 7 grams of fat, 22 grams of carbohydrates, and 2 grams of protein. The use of real butter adds richness and fat-soluble vitamins like A and E.
The recipe’s simplicity means it’s free from preservatives or artificial additives, especially if you choose natural pink coloring like beet powder. Using almond extract adds a touch of healthy antioxidants, too.
While not a low-carb treat, these sugar cookies can fit into a balanced diet when enjoyed in moderation. For gluten-free adaptations, almond or oat flours offer added fiber and protein benefits.
Personally, I appreciate that these cookies feel like a treat without feeling overly processed—comfort food with a little real ingredient soul.
Conclusion
Perfect Pink Velvet Sugar Cookies with Royal Icing have become a little slice of joy in my kitchen—a recipe that’s easy, approachable, and genuinely delicious. Whether you’re new to decorating or a seasoned cookie artist, this recipe gives you room to make it yours. From the soft, velvety crumb to the crisp, glossy icing, every bite is a reminder that sometimes the best recipes come from a little whim and a lot of heart.
Give these cookies a try, tweak the colors or flavors, and make the decorating your own. I’m always excited to hear how your batches turn out—share your creations, tips, or any fun twists you try. Here’s to sweet moments and even sweeter cookies!
FAQs
Can I make the cookie dough ahead of time?
Yes! You can prepare the dough and keep it refrigerated for up to 2 days before rolling and baking. Just make sure to wrap it tightly to prevent drying out.
How do I store cookies with royal icing without smudging?
Allow the icing to dry completely (several hours or overnight) before stacking. Use parchment or wax paper between layers and store in an airtight container at room temperature.
Can I use gel food coloring instead of liquid?
Absolutely! Gel food coloring is actually preferable as it won’t thin your dough or icing. Use a toothpick to add small amounts until you achieve the desired shade.
What if my royal icing cracks after drying?
Cracking usually means the icing was applied too thickly or dried too quickly. Try thinner layers and let the icing dry slowly in a cool, humid environment if possible.
Is it safe to use raw egg whites in royal icing?
Raw egg whites can carry a risk, so many bakers use pasteurized meringue powder as a safe alternative. If you use fresh egg whites, make sure they’re very fresh and from a trusted source.
Pin This Recipe!

Perfect Pink Velvet Sugar Cookies Recipe Easy Royal Icing Tutorial

Soft, tender pink velvet sugar cookies with a subtle natural pink tint, topped with smooth and crisp royal icing perfect for decorating or gifting.
- Prep Time: 30 minutes
- Cook Time: 12 minutes
- Total Time: 1 hour 42 minutes
- Yield: 24 servings 1x
- Category: Dessert
- Cuisine: American
Ingredients
- 2 ½ cups (310 grams) all-purpose flour
- 1 teaspoon baking powder
- ½ teaspoon salt
- 1 cup (227 grams) unsalted butter, softened
- 1 ¼ cups (250 grams) granulated sugar
- 2 large eggs, room temperature
- 1 ½ teaspoons vanilla extract
- ½ teaspoon almond extract (optional)
- 1–2 teaspoons pink food coloring or beet juice powder
- For the Royal Icing:
- 4 cups (480 grams) powdered sugar, sifted
- 3 large egg whites or 3 tablespoons pasteurized meringue powder mixed with water
- 1 tablespoon lemon juice or vanilla extract
- Pink food coloring (optional)
Instructions
- In a medium bowl, sift together 2 ½ cups all-purpose flour, 1 teaspoon baking powder, and ½ teaspoon salt. Set aside.
- Using an electric mixer, beat 1 cup softened unsalted butter with 1 ¼ cups granulated sugar until light and fluffy, about 3-4 minutes.
- Beat in 2 large eggs, one at a time, then stir in 1 ½ teaspoons vanilla extract and ½ teaspoon almond extract if using.
- Add 1-2 teaspoons of pink food coloring or beet juice powder and mix until color is evenly distributed.
- Gradually add the flour mixture to the wet ingredients, mixing on low speed just until combined. Avoid overmixing.
- Wrap the dough in plastic wrap and refrigerate for at least 1 hour.
- Preheat oven to 350°F (175°C). Line baking sheets with parchment paper or silicone mats.
- Roll dough on a lightly floured surface to about ¼ inch (6 mm) thickness. Cut shapes with cookie cutters and transfer to baking sheets.
- Bake for 10-12 minutes until edges start to turn golden but centers remain soft.
- Transfer cookies to a wire rack and let cool completely before icing.
- Prepare royal icing by beating 3 large egg whites (or 3 tablespoons meringue powder mixed with water) with 4 cups sifted powdered sugar and 1 tablespoon lemon juice until stiff peaks form and icing is glossy.
- Add pink food coloring if desired, then pipe or spread icing onto cooled cookies.
- Let icing dry at room temperature for several hours or overnight to set.
Notes
Chill dough for at least 1 hour to prevent spreading. Use room temperature eggs for better mixing. Use an oven thermometer to avoid overbaking. Clean beaters thoroughly before whipping egg whites for royal icing. Let icing dry completely before stacking cookies to prevent smudging. For vegan or dairy-free versions, substitute butter with plant-based alternatives and use aquafaba instead of egg whites in icing. Gluten-free flour blends can be used but adjust baking times.
Nutrition
- Serving Size: 1 cookie
- Calories: 150
- Fat: 7
- Carbohydrates: 22
- Protein: 2
Keywords: pink velvet sugar cookies, royal icing, sugar cookies, pink cookies, easy sugar cookie recipe, decorated cookies, baking tutorial