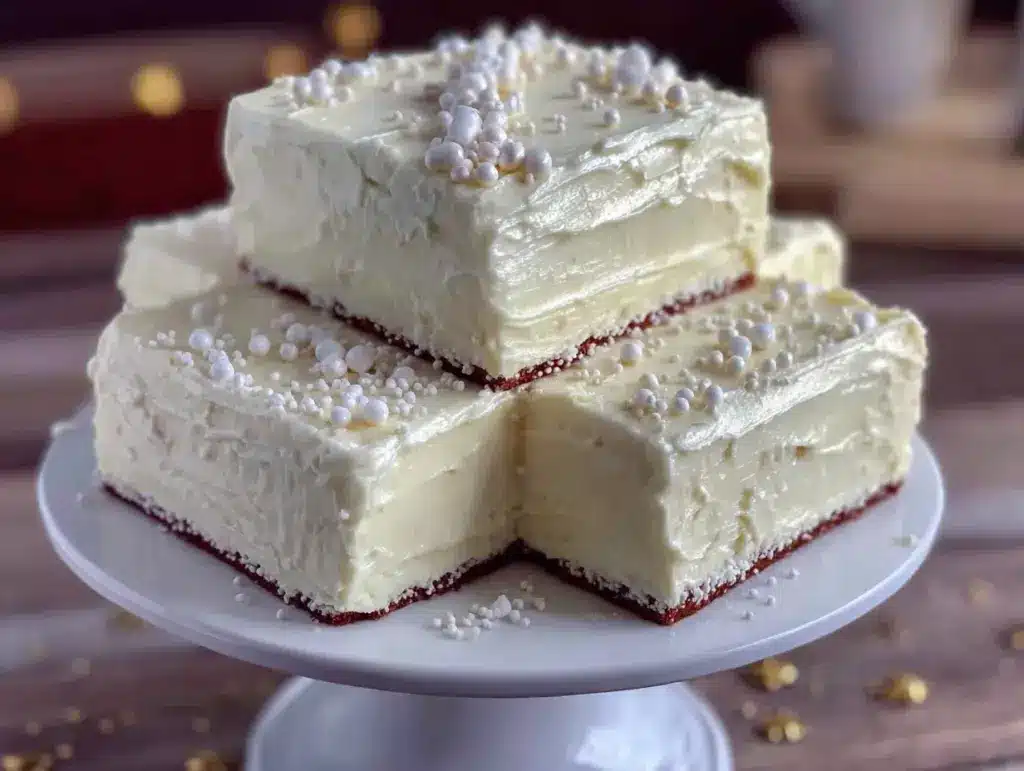
“Can you believe it? You’re really graduating!” my niece said, practically bouncing as she hovered by the kitchen counter. I was elbow-deep in flour and icing, trying to pull off what felt like a cake miracle—a perfect tiered vanilla graduation sheet cake with gold fondant. Honestly, I wasn’t sure if I was biting off more than I could chew when she asked if I’d make the cake for her graduation party. I’m not exactly a cake decorator by trade, yet the idea of making something special for her big day pushed me to take a deep breath and commit.
There was this moment, right in the middle of smoothing the fondant, when I doubted everything. The fondant was sticking, the tiers seemed a little wobbly, and the clock was mercilessly ticking. But you know what? That nervous chaos somehow made it feel like a real celebration in progress. The vanilla cake layers, baked just right, filled the kitchen with this cozy, warm scent that reminded me of simpler times—like the scent of my pumpkin spice bread baking on a chilly morning, but lighter, fresher.
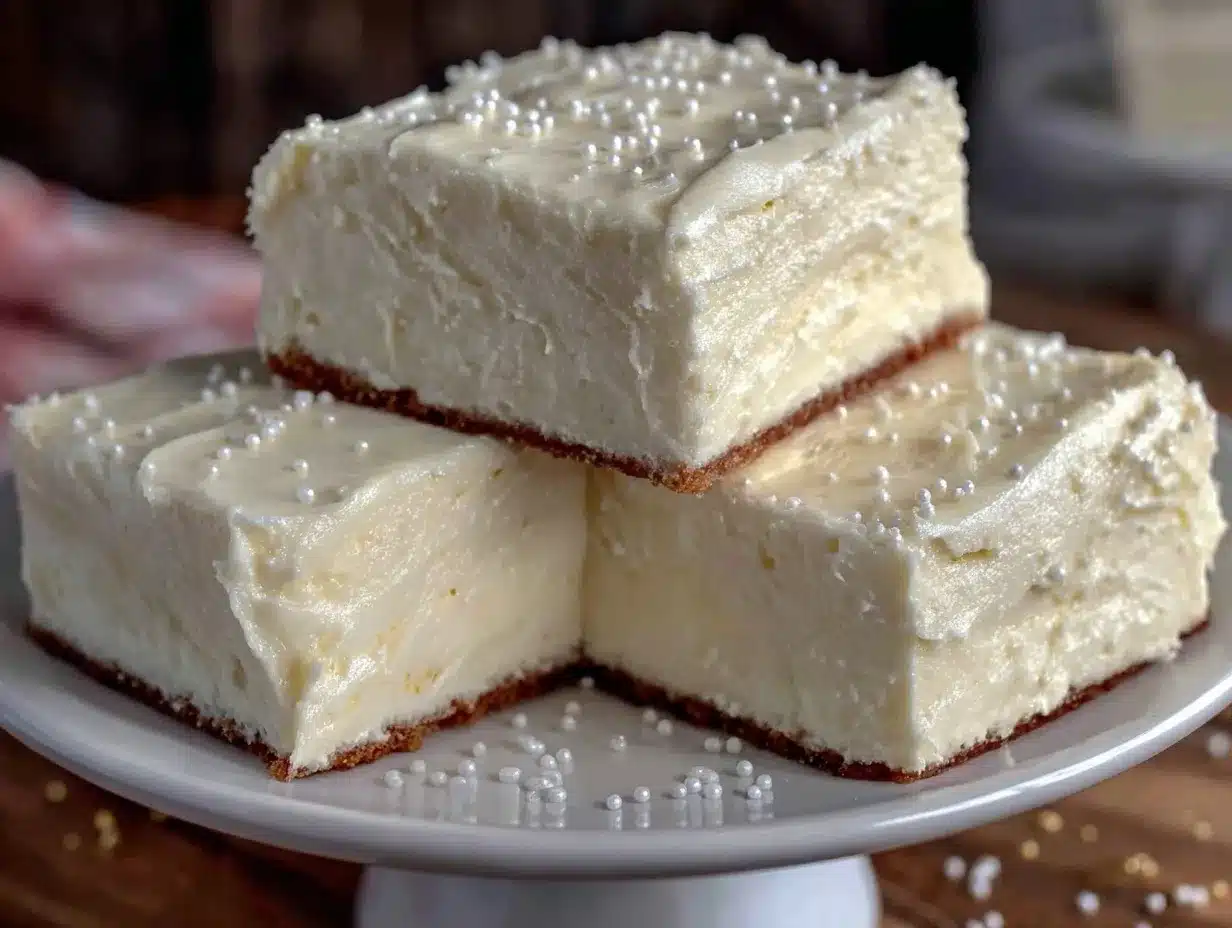
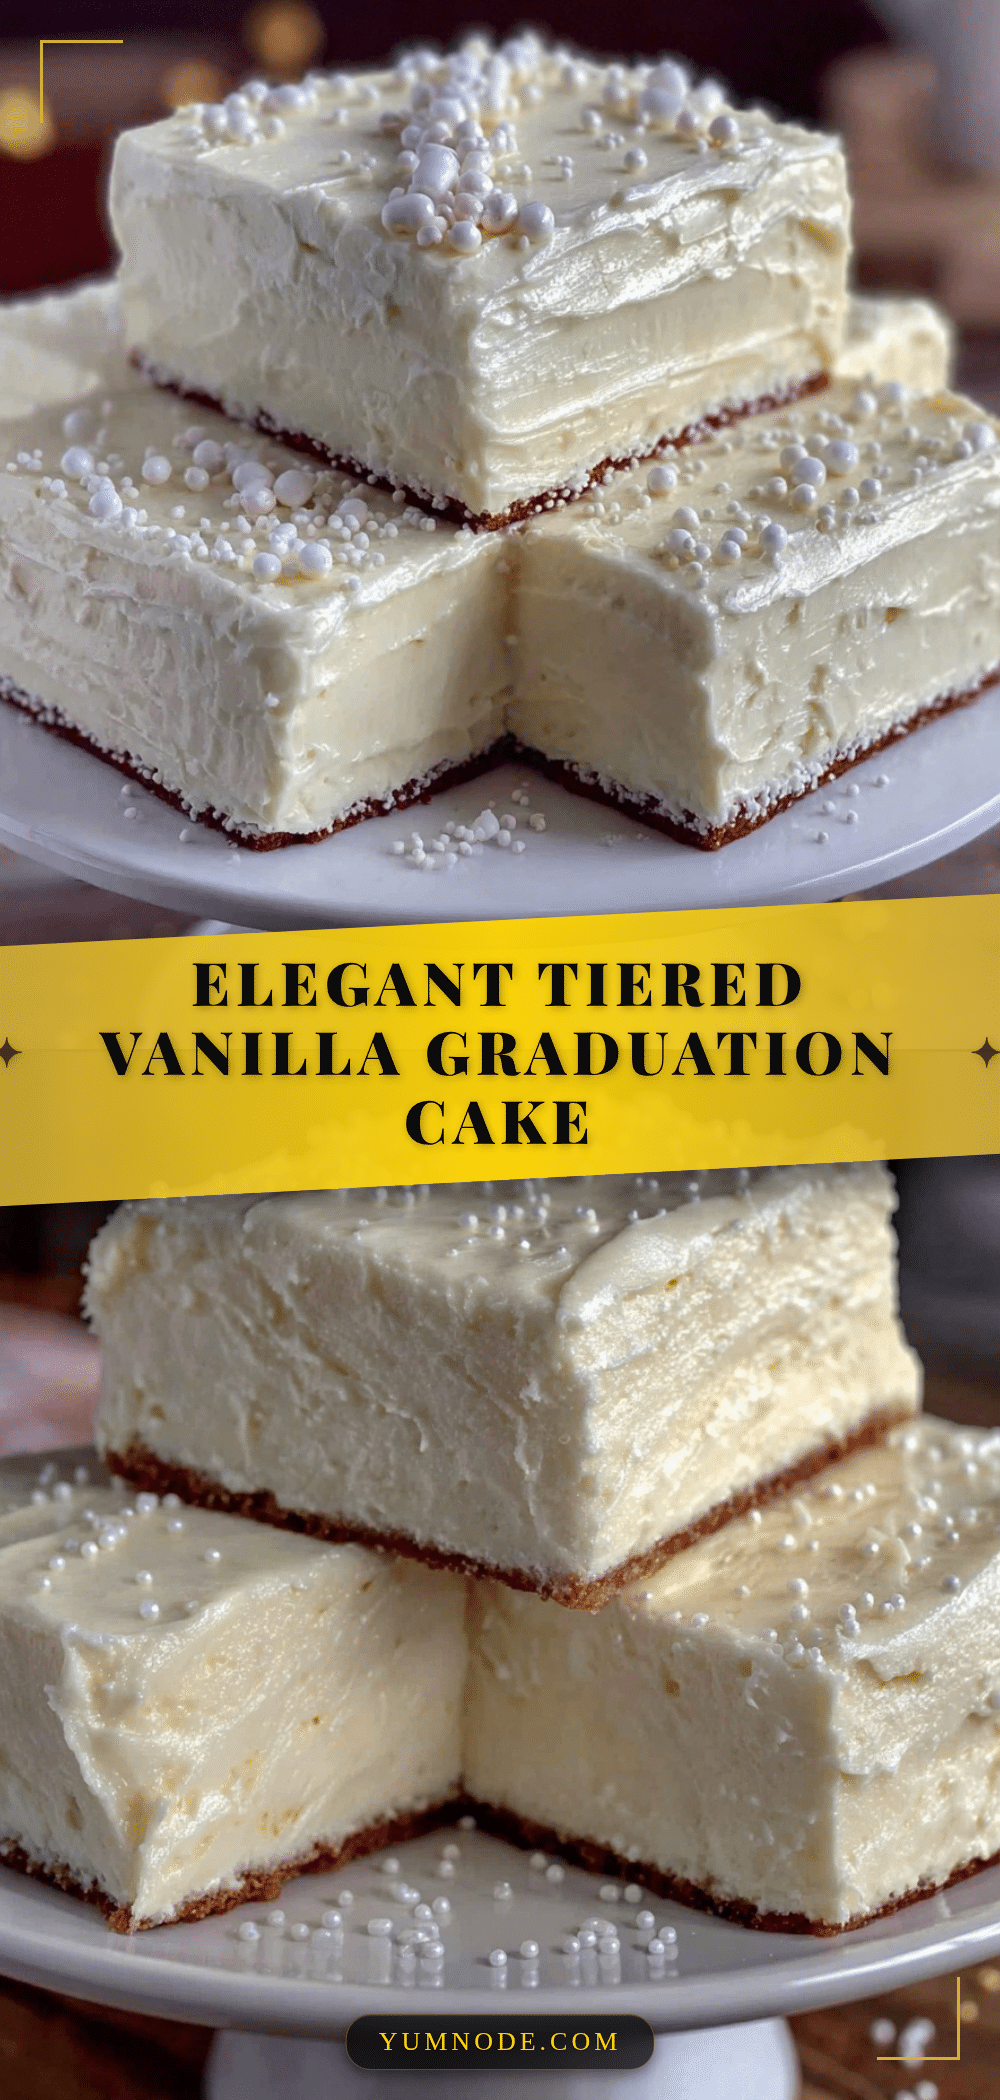
By the time the gold fondant shimmered softly under the kitchen lights, and the tiers stood proudly like a little monument to achievement, I realized this wasn’t just a cake; it was a moment captured in sugar and vanilla. I’ve since found that this recipe is surprisingly forgiving and rewarding. It’s become my go-to for milestone celebrations—simple enough to handle on a busy weekend, yet fancy enough to impress the crowd.
What stuck with me the most is how this cake carries a quiet promise: a sweet reward after hard work, a nod to new beginnings, and the kind of treat that makes you pause and savor the moment. If you’re looking for a cake that’s as much about the memories as the flavors, this perfect tiered vanilla graduation sheet cake with gold fondant might just be the one to try.
Why You’ll Love This Perfect Tiered Vanilla Graduation Sheet Cake
This cake isn’t just another layered dessert; it’s a celebration centerpiece that’s been tested, tweaked, and loved through multiple graduations and family gatherings. Here’s why it could become your favorite too:
- Quick & Easy: Despite looking fancy, the recipe comes together in under 2 hours, making it manageable even when you’re juggling party prep and last-minute details.
- Simple Ingredients: You probably have the basics in your pantry—flour, sugar, eggs, vanilla extract—nothing exotic or intimidating.
- Perfect for Graduation Parties: The tiered sheet design feeds a crowd beautifully and brings that “wow” factor without the fuss of round cakes.
- Crowd-Pleaser: The moist vanilla layers with silky buttercream and smooth fondant get raves every time from kids and adults alike.
- Stunning Gold Fondant Finish: The gold fondant adds a touch of elegance and celebration sparkle that’s hard to beat, setting this cake apart from basic sheet cakes.
What really makes this recipe stand out is the balance of flavors and textures. The vanilla cake is light but rich, with a tender crumb that contrasts perfectly with the smooth, buttery frosting and the clean, polished look of the fondant. Plus, I’ve included tips for working with the fondant that helped me avoid the sticky messes I’d feared when I started.
This cake isn’t just dessert—it’s the kind of creation that makes people pause and say, “Wow, you made this?” It’s comfort food with a touch of celebration sparkle, perfect for honoring milestones without stress or compromise.
What Ingredients You Will Need
This recipe uses straightforward, wholesome ingredients to create a moist, flavorful vanilla cake layered with creamy buttercream and finished with smooth gold fondant. Most of the ingredients are pantry staples, with a few specialty touches for the fondant and gold effect.
- For the Vanilla Cake:
- All-purpose flour – 3 cups (360g) (I prefer King Arthur for consistent results)
- Baking powder – 1 tbsp
- Baking soda – 1/2 tsp
- Salt – 1/2 tsp
- Unsalted butter – 1 cup (227g), softened (use European-style butter if you want extra richness)
- Granulated sugar – 2 cups (400g)
- Large eggs – 4, room temperature
- Pure vanilla extract – 2 tbsp (don’t skimp here, quality vanilla makes all the difference)
- Buttermilk – 1 cup (240ml), room temperature (adds moisture and tang)
- For the Buttercream Frosting:
- Unsalted butter – 1 cup (227g), softened
- Powdered sugar – 4 cups (480g), sifted
- Pure vanilla extract – 1 tbsp
- Heavy cream or milk – 2-4 tbsp (adjust for desired consistency)
- Pinch of salt
- For the Gold Fondant Decoration:
- Ready-to-roll white fondant – about 1 lb (450g) (Wilton brand works well and rolls smoothly)
- Edible gold luster dust – 1 tsp (for that shimmer and shine)
- Clear vanilla extract or vodka – a few drops (to mix with luster dust for painting)
For the fondant, if you want to avoid fondant altogether, you can try a thick buttercream finish, but the gold sheen will be less dramatic. For a gluten-free option, substitute the all-purpose flour with a gluten-free blend and adjust baking time accordingly. If you don’t have buttermilk, mix 1 cup milk with 1 tbsp lemon juice and let sit 5 minutes.
Equipment Needed
- Two 9×13-inch (23×33 cm) sheet pans for the cake layers—non-stick or greased and parchment-lined for easy release
- Large mixing bowls and a stand mixer or hand mixer (trust me, a stand mixer makes the buttercream silky smooth)
- Offset spatula and bench scraper for frosting smoothness
- Rolling pin for fondant smoothing
- Fondant smoother tool (optional but handy for that flawless finish)
- Small paintbrush for applying gold luster dust
- Cooling racks
- Measuring cups and spoons (both metric and US standard)
If you don’t have a fondant smoother, your hands and a clean, flat surface will do just fine—just take your time! For rolling fondant, light dusting with cornstarch prevents sticking. I once forgot this step and ended up with a sticky mess, so trust me on this. A budget-friendly alternative for edible gold dust is mixing a tiny bit of yellow food coloring with a shimmer powder, but the luster dust gives that genuine metallic glow.
Preparation Method
- Preheat and Prep: Preheat your oven to 350°F (175°C). Grease and line two 9×13-inch sheet pans with parchment paper. This usually takes about 10 minutes including prepping your ingredients.
- Mix Dry Ingredients: In a medium bowl, sift together 3 cups (360g) flour, 1 tbsp baking powder, 1/2 tsp baking soda, and 1/2 tsp salt. Set aside.
- Cream Butter and Sugar: In a large bowl, beat 1 cup softened butter and 2 cups sugar on medium speed until light and fluffy—about 3-5 minutes. This step is key to a tender crumb, so don’t rush it.
- Add Eggs and Vanilla: Beat in 4 room temperature eggs one at a time, then mix in 2 tbsp vanilla extract. The batter will look smooth and glossy here.
- Alternate Adding Dry Ingredients and Buttermilk: With the mixer on low, add dry ingredients in three parts, alternating with 1 cup buttermilk, starting and ending with the dry. Mix just until combined; overmixing can make the cake dense.
- Pour and Bake: Divide batter evenly between pans (about 4 cups batter per pan). Smooth the tops with a spatula. Bake 30-35 minutes or until a toothpick inserted comes out clean. Don’t open the oven early or the cake might sink.
- Cool Completely: Let cakes cool in the pans for 15 minutes, then turn out onto cooling racks until fully cooled (about 1 hour). Fondant won’t stick well to warm cakes!
- Make Buttercream: Beat 1 cup softened butter until creamy. Gradually add 4 cups powdered sugar, beating on low at first, then high. Mix in 1 tbsp vanilla, salt pinch, and 2-4 tbsp heavy cream until fluffy and spreadable.
- Assemble the Cake: Place one cake layer on your serving board. Spread an even layer (about 1/2 inch) of buttercream. Top with the second layer. Crumb coat the entire cake with a thin buttercream layer and chill 20 minutes.
- Cover with Fondant: Knead fondant until pliable. Roll out on a lightly cornstarch-dusted surface to about 1/8 inch thickness, large enough to cover the cake with some overhang. Carefully drape over cake, smoothing gently with your hands or fondant smoother to remove air bubbles.
- Apply Gold Finish: Mix 1 tsp edible gold luster dust with a few drops of clear vanilla extract or vodka to form edible paint. Using a small brush, paint the fondant evenly for that shimmering graduation-worthy shine. Let dry 15 minutes.
- Stack and Final Touches: For a tiered look, you can stack smaller sheet cakes or trim layers as desired. Insert wooden dowels or straws for stability if stacking more than two layers. Add optional decorations like piped buttercream borders or edible stars.
Pro tip: If your fondant tears while covering, patch it gently with a small piece of fondant and smooth out. This recipe’s buttercream base helps the fondant stick better and keeps everything moist.
Cooking Tips & Techniques for the Perfect Cake
Working with a tiered vanilla graduation sheet cake and fondant can feel intimidating, but these tips make the process smoother:
- Room Temperature Ingredients: Eggs, butter, and buttermilk should be at room temp so they blend seamlessly. Cold ingredients can cause batter to curdle.
- Don’t Overmix the Batter: Mix just until combined after adding the dry ingredients. Overmixing develops gluten and leads to dense cake.
- Crumb Coat is Your Friend: Applying a thin crumb coat traps crumbs and creates a smooth surface for fondant. Chill it well before fondant application.
- Fondant Handling: Knead fondant until soft but not sticky. Roll it evenly to avoid cracks. Use a fondant smoother or your hands to gently press and smooth over the cake.
- Gold Luster Dust Application: Mix with a clear extract or alcohol to make edible paint—this prevents powdery texture and gives a smooth metallic finish.
- Stacking Stability: If stacking tiers, insert dowels or sturdy straws to support the weight and prevent sinking or sliding.
- Patience with Cooling and Setting: Never rush cooling or fondant drying time. Warm cake or wet fondant causes slipping or tearing.
One time, I underestimated the chilling step and ended up with fondant sliding off—lesson learned the hard way! Also, multitasking by prepping the buttercream while the cakes cool saves time and keeps the workflow smooth. And if you want to try a different twist, I’ve found that adding a hint of almond extract to the buttercream creates a lovely nuance without overpowering the vanilla.
Variations & Adaptations
This recipe is quite flexible, so you can adjust it for your preferences or dietary needs:
- Flavor Variations: Swap 1 tsp of vanilla extract with almond or lemon extract for a subtle flavor twist. Adding fresh strawberry preserves between layers adds a fruity surprise.
- Dietary Adjustments: Use a gluten-free flour blend instead of all-purpose flour (I recommend Bob’s Red Mill 1-to-1 for best texture). For dairy-free, substitute butter with vegan margarine and use coconut or almond milk mixed with vinegar as buttermilk replacement.
- Fondant Alternatives: If fondant isn’t your thing, you can frost the cake entirely with buttercream and dust with edible gold shimmer powder or gold sprinkles for the same celebratory look.
- Tier Configurations: Instead of two large sheet pans, try stacking three smaller 8×8-inch pans for a more manageable tiered effect. Just remember to support the layers properly!
Personally, I once tried a vanilla bean version by scraping seeds from a pod into the batter—next-level flavor that impressed my whole family. If you’re curious, this pairs beautifully with a fresh berry compote or even a light cream cheese frosting layer under the fondant.
Serving & Storage Suggestions
This tiered vanilla graduation sheet cake with gold fondant looks stunning served at room temperature. The flavors and textures really open up once it’s not chilled too cold, so take it out 30 minutes before serving.
Slice it with a sharp serrated knife dipped in hot water (wiped dry) for clean cuts. The cake pairs wonderfully with a cup of coffee or a sparkling lemonade, especially if you want to lighten the sweetness a bit.
Leftovers keep well in an airtight container in the refrigerator for up to 4 days. Fondant can get a little firm when chilled, so let slices come to room temperature before eating. For longer storage, you can freeze individual slices wrapped tightly in plastic wrap for up to 3 months—thaw overnight in the fridge.
Interestingly, the flavors meld and deepen after a day, making it even better the next day. So if you can’t resist a slice right away, maybe save some for later—it’s worth it!
Nutritional Information & Benefits
This vanilla sheet cake is a delightful treat, offering about 350-400 calories per serving depending on slice size. Key ingredients like eggs and butter provide protein and fat contributing to satiety, while the flour supplies carbohydrates for energy.
Vanilla extract contains antioxidants, and using real butter and buttermilk adds depth of flavor with wholesome dairy fats. For those watching gluten or dairy, the recipe adapts well to alternatives without losing texture or taste.
While this cake is definitely a celebratory indulgence, pairing it with fresh fruit or a light salad (like the fresh strawberry spinach salad with creamy poppyseed dressing) balances the meal nicely. Moderation and enjoyment go hand in hand!
Conclusion
This perfect tiered vanilla graduation sheet cake with gold fondant isn’t just a dessert—it’s a celebration made edible. It’s approachable enough to make at home, even if you don’t consider yourself a baker, yet impressive enough to take center stage at any graduation party or milestone event.
Feel free to customize the flavors, the tiers, or the decoration to suit your style and occasion. I keep coming back to this recipe because it manages to be both comforting and festive—a rare combo that’s truly satisfying.
Give it a try, tweak it your way, and you might find yourself making it again and again for every celebration on your calendar. I’d love to hear how your cake turned out or what fun variations you tried—drop a comment or share your photos for the sweet community vibes!
Remember, every great celebration deserves a cake that tastes as good as it looks—this one definitely fits the bill.
Frequently Asked Questions
- Can I make this cake gluten-free? Yes! Substitute the all-purpose flour with a 1-to-1 gluten-free baking flour blend and adjust baking time as needed.
- How do I prevent fondant from sticking? Lightly dust your rolling surface and rolling pin with cornstarch or powdered sugar to keep the fondant from sticking while rolling.
- Can I prepare this cake ahead of time? Absolutely. You can bake the cake layers a day in advance and keep them wrapped tightly in plastic wrap. Assemble and decorate the next day for best freshness.
- What if I don’t have edible gold luster dust? You can skip the gold or use gold-colored sprinkles or edible glitter for a similar festive effect.
- How do I store leftover cake with fondant? Store in an airtight container at room temperature if eaten within a day or two, or refrigerate wrapped tightly to keep the fondant firm. Let it come to room temp before serving.
Pin This Recipe!
Perfect Tiered Vanilla Graduation Sheet Cake Recipe with Gold Fondant

A moist and flavorful vanilla sheet cake layered with creamy buttercream and finished with smooth gold fondant, perfect for graduation parties and milestone celebrations.
- Prep Time: 20 minutes
- Cook Time: 35 minutes
- Total Time: 1 hour 55 minutes
- Yield: 12-16 servings 1x
- Category: Dessert
- Cuisine: American
Ingredients
- 3 cups (360g) all-purpose flour
- 1 tbsp baking powder
- 1/2 tsp baking soda
- 1/2 tsp salt
- 1 cup (227g) unsalted butter, softened
- 2 cups (400g) granulated sugar
- 4 large eggs, room temperature
- 2 tbsp pure vanilla extract
- 1 cup (240ml) buttermilk, room temperature
- 1 cup (227g) unsalted butter, softened (for buttercream)
- 4 cups (480g) powdered sugar, sifted
- 1 tbsp pure vanilla extract (for buttercream)
- 2–4 tbsp heavy cream or milk (for buttercream)
- Pinch of salt (for buttercream)
- About 1 lb (450g) ready-to-roll white fondant
- 1 tsp edible gold luster dust
- A few drops clear vanilla extract or vodka (to mix with luster dust)
Instructions
- Preheat oven to 350°F (175°C). Grease and line two 9×13-inch sheet pans with parchment paper.
- In a medium bowl, sift together flour, baking powder, baking soda, and salt. Set aside.
- In a large bowl, beat softened butter and granulated sugar on medium speed until light and fluffy, about 3-5 minutes.
- Beat in eggs one at a time, then mix in vanilla extract until smooth and glossy.
- With mixer on low, add dry ingredients in three parts alternating with buttermilk, starting and ending with dry ingredients. Mix just until combined.
- Divide batter evenly between pans and smooth tops. Bake 30-35 minutes or until a toothpick inserted comes out clean.
- Cool cakes in pans for 15 minutes, then turn out onto cooling racks until completely cooled, about 1 hour.
- For buttercream, beat softened butter until creamy. Gradually add powdered sugar, beating on low then high speed. Mix in vanilla extract, salt, and heavy cream until fluffy and spreadable.
- Place one cake layer on serving board. Spread an even 1/2 inch layer of buttercream. Top with second layer. Crumb coat entire cake with thin buttercream layer and chill 20 minutes.
- Knead fondant until pliable. Roll out on lightly cornstarch-dusted surface to about 1/8 inch thickness, large enough to cover cake with some overhang.
- Drape fondant over cake, smoothing gently with hands or fondant smoother to remove air bubbles.
- Mix edible gold luster dust with a few drops of clear vanilla extract or vodka to form edible paint. Using a small brush, paint fondant evenly and let dry 15 minutes.
- For tiered look, stack smaller sheet cakes or trim layers as desired. Insert wooden dowels or straws for stability if stacking more than two layers. Add optional decorations like piped buttercream borders or edible stars.
Notes
Use room temperature ingredients for best results. Do not overmix batter to avoid dense cake. Crumb coat before fondant application for smooth finish. Dust rolling surface with cornstarch to prevent fondant sticking. Insert dowels or straws for tier stability. Let cake and fondant set properly to avoid slipping or tearing. For gluten-free, substitute flour with gluten-free blend and adjust baking time. For dairy-free, use vegan margarine and plant-based milk with vinegar as buttermilk substitute.
Nutrition
- Serving Size: 1 slice (approximate
- Calories: 375
- Sugar: 38
- Sodium: 220
- Fat: 18
- Saturated Fat: 11
- Carbohydrates: 52
- Fiber: 1
- Protein: 4
Keywords: vanilla cake, tiered cake, graduation cake, sheet cake, gold fondant, buttercream, celebration cake